
Outboard Motor Skeg Repair: Lessons from 15 Years of Fixes in South Florida
I’ve been wrenching on outboard motors for 15 years, mostly in the salty, humid marinas of Miami and Fort Lauderdale. That gut-wrenching thump when your boat hits a rock or sandbar? I’ve heard it too many times—last July, a client named Javier at Dinner Key Marina limped in with his Yamaha 200 after clipping a reef off Key Biscayne. His skeg was mangled, and he was staring at a $3,000 repair bill if it went south. Here’s what I’ve learned about fixing skegs the right way, saving you from a busted gearcase and a ruined day on the water.
What’s a Skeg and Why Should You Care?
Your skeg’s not just a chunk of metal hanging off your outboard—it’s the unsung hero keeping your propeller and gearcase safe. I think of it as the motor’s keel, taking the brunt of impacts so your $5,000 prop doesn’t. A damaged skeg can turn a great day boating into a nightmare, and I’ve seen it happen too often in South Florida’s shallow waters.
What Does a Skeg Actually Do?
The skeg’s got three big jobs, and it’s working every second you’re on the water:
- Protects Your Prop and Gearcase: As the lowest part of your outboard, it’s the first to hit rocks or debris, saving your prop and gears from a $2,000–$5,000 repair. I saw this firsthand last summer when a buddy’s Sea Ray 230 hit a sandbar—skeg took the hit, prop stayed fine.
- Keeps You Steering Straight: Like a rudder, it stops your boat from wobbling side-to-side during turns. Without it, you’re fighting the wheel, especially at high speeds.
- Balances Prop Torque: It counters the prop’s twist, keeping your ride smooth. A bent skeg on a client’s Boston Whaler last month made his boat pull hard to the right—fixed it for $200.
What Happens When It’s Damaged?
Skeg damage isn’t just cosmetic. I’ve seen everything from tiny nicks to full-on breaks, and each type’s a different beast:
- Chips and Gouges: Small scratches from gravel or sand—annoying but fixable.
- Bends: Sideways hits that mess with steering. I caught one on a Mercury 150 last June using a straightedge—steering was off by 5 degrees.
- Cracks: Hairline fractures, especially where the skeg meets the gearcase. These are bad news—ignore them, and you’re risking a $4,000 gearcase failure.
- Big Breaks: Chunks gone, leaving your prop exposed. A guy at Stiltsville lost half his skeg in 2024; cost him $800 to weld.
Ignoring damage is a gamble. A bent skeg burns more fuel—up to 10% more, I’ve seen—and makes your boat handle like a shopping cart. Worse, a crack can spread to the gearcase, and that’s a $5,000–$10,000 repair. I tell clients: fix it now, or cry later.
How Do I Check Skeg Damage Like a Pro?
Before you touch a tool, you’ve got to play detective. A good inspection saves you from guessing wrong and wasting money. Last spring, a client at Bahia Mar thought his skeg was fine after a bump—until I found a hairline crack that could’ve killed his gearcase.
My Five-Minute Inspection Trick
Here’s how I check a skeg, whether it’s a Yamaha, Mercury, or Evinrude:
- Clean It Up: Scrub the skeg and lower unit with a wire brush. Grime hides cracks—I missed one once in 2018 and swore I’d never skip this again.
- Straightedge Test: Grab a ruler or level and hold it against the skeg’s flat sides. A 0.1” bend shows up instantly. Found one on a client’s Honda 250 last month—steering was off.
- Hunt for Cracks: Use a flashlight to check where the skeg meets the gearcase. Hairline cracks here scream “get a pro.” I caught one on a Sea Ray at Coconut Grove in 2024—saved a $3,000 repair.
- Measure the Damage: If a piece is gone, eyeball how much. A missing inch is DIY-able; half the skeg means welding. I use a tape measure for precision.
Questions to Guide Your Fix
Ask yourself these to pick the right repair path:
- Cosmetic or Structural? Chips are cosmetic; bends or cracks are structural and affect safety.
- What’s Your Budget? Epoxy’s $20; welding’s $300–$800; a new lower unit’s $5,000+.
- Got DIY Skills? Sanding and epoxy are easy; welding cast aluminum takes serious know-how.
- Where Do You Boat? South Florida’s reefs and shallows demand tough fixes—think skeg guards or welds.
A solid inspection’s your roadmap. Skip it, and you’re throwing darts blindfolded.
Can I Fix a Skeg Myself? DIY Options for Minor Damage
If your skeg’s got chips or small breaks, you can handle it without a pro. I’ve shown buddies at Key Biscayne how to do this in an afternoon—saves a trip to the shop and keeps your wallet happy.
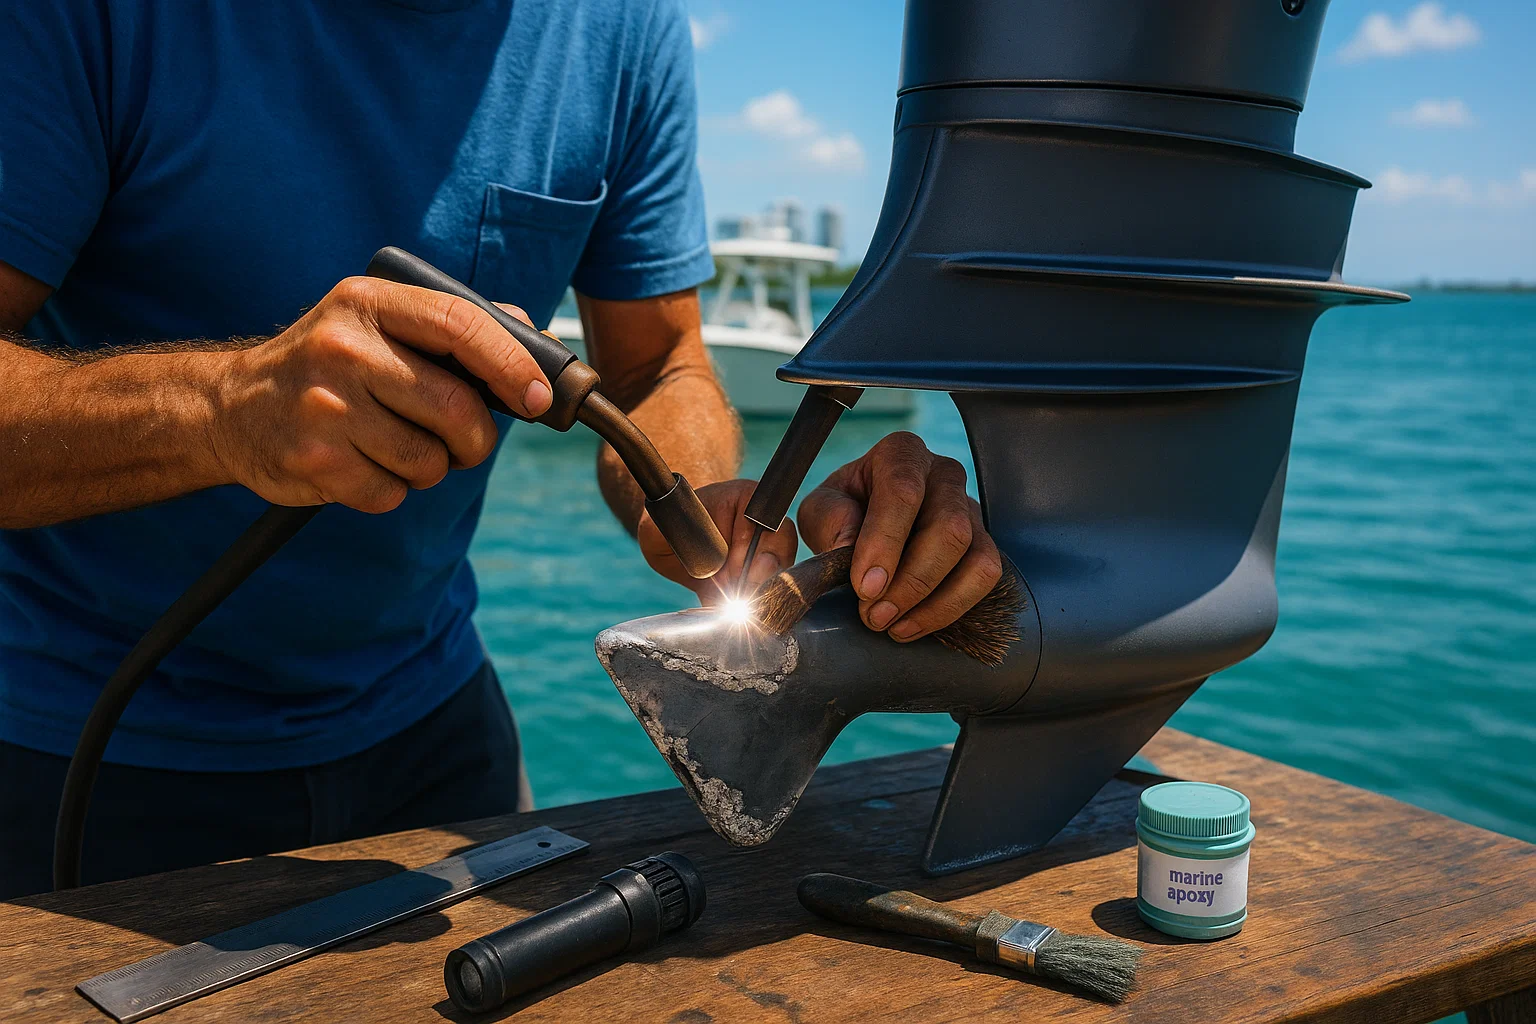
Option 1: Marine Epoxy for Chips and Gouges
For nicks or small chips, marine-grade epoxy is a lifesaver. I swear by J-B Weld MarineWeld—waterproof, tough, and sticks like nobody’s business. Fixed a client’s Yamaha 90 last summer for $15.
Here’s my process:
- Sand It Down: Use 80-grit sandpaper to hit bare metal. Rough surfaces bond better.
- Mix and Slap It On: Mix the two-part epoxy and apply it slightly above the skeg’s shape. I use a popsicle stick for precision.
- Shape It: Smooth it with a putty knife to match the skeg’s curve. Let it cure for 24 hours.
- Finish Up: Sand it smooth with 200-grit and paint with color-matched outboard paint to stop corrosion. I use Mercury Phantom Black—looks sharp.
Option 2: Bolt-On Skeg Guard for Small Breaks
If the bottom 2–3 inches are gone, a skeg guard’s your friend. It’s a stainless steel sleeve that slides over the skeg—takes 15 minutes to install. I put one on a buddy’s Evinrude 115 at Stiltsville last July; he was back on the water by noon.
- Slide the guard on and tap it with a rubber mallet for a tight fit.
- Drill through the guard’s pre-drilled holes into the skeg. I use a 3/16” bit.
- Bolt it with marine-grade thread locker—keeps them from rattling loose in Florida’s choppy waters.
Skeg Guard Pros and Cons
Skeg guards are a hot topic at marinas. Here’s my take:
- Pros: Quick to install, tough as nails, great for shallow waters like Key Biscayne.
- Cons: Drilling holes can weaken the skeg. A hard hit later might snap it at the holes, making welding trickier. I saw this on a client’s boat in 2023—cost him $500 extra.
For minor stuff, epoxy or a skeg guard gets you back on the water fast. Anything more, and you’re calling a pro.
When Should I Call a Pro for Skeg Repairs?
Big breaks or cracks near the gearcase? Step away from the toolbox. I’ve seen DIY welding jobs go south—warped gearcases, ruined seals, $4,000 in damage. Last June, a guy at Coconut Grove tried welding his own Mercury 200 skeg. He botched the heat control, and his gears were toast.
Why Welding’s a Pro Job
Welding cast aluminum’s tricky. Too much heat warps the gearcase, wrecking seals and gears. A pro uses TIG welding with wet rags and heat-sink paste to keep things cool. I watched a master welder, Ray, at Bahia Mar fix a Yamaha 250 skeg in 2024—looked factory-new for $600.
Here’s their process:
- Prep the Break: Grind a V-groove for deep weld penetration. Ray taught me this—it’s key for strength.
- Weld It Up: Layer aluminum carefully, filling the gap or adding a new piece. Takes a steady hand.
- Finish It: Grind and sand to match the skeg’s shape, then prime and paint. I use a 400-grit wheel for smoothness.
Weld-On Replacement for Total Loss
If your skeg’s sheared off, a weld-on replacement’s the way to go. These are pre-made skeg sections for specific outboards—Mercury, Yamaha, you name it. A pro cuts the damaged bit clean and welds the new piece on. I saw this done on a Honda 150 at Fort Lauderdale’s marina last month—$800 versus $5,000 for a new lower unit.
Pro welding’s not cheap, but it’s a fraction of replacing your gearcase. It’s the only way to guarantee your motor’s safe for South Florida’s reefs.
How Do I Choose the Right Skeg Repair? A Decision Guide
Picking the right fix depends on damage, budget, and how you boat. I’ve fixed hundreds of skegs in Miami, and repairing’s almost always cheaper than replacing the lower unit. Here’s how to decide.
Repair or Replace the Lower Unit?
It comes down to where the damage stops:
- Skeg-Only Damage: Chips, bends, or breaks confined to the skeg are fixable. Epoxy, guards, or welding work great.
- Gearcase Cracks: If cracks reach the gearcase housing, you’re risking a $5,000+ replacement. I saw this on a client’s Bayliner in 2024—crack spread, gears failed, big bill.
If you see cracks in the gearcase, get a pro to assess. Ignoring them’s like ignoring a toothache—it’ll only get worse.
My Skeg Repair Cheat Sheet
Here’s a table I put together from jobs I’ve seen in South Florida:
| Repair Method | Damage Type | Strength | Cost | Skill Level |
|---|---|---|---|---|
| Marine Epoxy | Chips, Gouges | Good for cosmetics | $20–$50 | DIY |
| Skeg Guard | Small Breaks (2–3 inches) | Decent, but drill risk | $50–$150 | DIY |
| Professional Welding | Major Breaks, Cracks | Factory-strong | $300–$800 | Pro Only |
| Weld-On Replacement | Complete Loss | Factory-strong | $500–$1,000 | Pro Only |
Weigh your skills and how you boat. If you’re dodging reefs in Key Biscayne, go for a robust fix like welding.

FAQ: Common Skeg Repair Questions
What’s the Best Way to Fix a Skeg Chip?
For chips, I grab J-B Weld MarineWeld—$20 and done in a day. Sand to bare metal, apply epoxy, shape it, and paint. Fixed a Yamaha 90’s chip in 2024 for a buddy at Dinner Key. It’s held up through a year of salty water.
Can I Use a Skeg Guard on Any Outboard?
Most outboards, yeah—Mercury, Yamaha, Honda. Check the model fit; brands like SkegShield make specific ones. I installed one on an Evinrude 115 in 15 minutes. Just know drilling might weaken the skeg long-term.
How Much Does Professional Skeg Welding Cost?
Expect $300–$800, depending on damage. A Yamaha 250 weld at Bahia Mar ran $600 last year. Cheaper than a $5,000 lower unit replacement. Always get a shop with ABYC-certified welders.
When Should I Replace the Lower Unit?
If cracks hit the gearcase housing, you’re in trouble. I saw a Bayliner’s gearcase crack in 2024—$6,000 to replace. Get a pro to check; don’t gamble on a patch job.
How Do I Prevent Skeg Damage in Shallow Water?
Go slow in shallows like Key Biscayne. I use a depth finder and keep a skeg guard on my own boat. Trim your motor up when you can—it saved my Mercury 150 last summer.
Why Do Skegs Break So Easily?
They’re built to break before your prop or gears do. Cast aluminum’s strong but brittle. I’ve seen dozens snap on reefs—design saves the expensive stuff but means repairs.
How Long Does a Skeg Repair Last?
Epoxy lasts 1–2 years; welding or replacements are permanent if done right. A $600 weld I oversaw in 2023’s still holding. Use marine paint to stop corrosion—key in Florida’s salt.
Conclusion: Protect Your Skeg, Save Your Motor
A skeg’s not just a piece of metal—it’s your motor’s shield. I’ve seen too many boaters at Fort Lauderdale’s marinas ignore a bent skeg and end up with a $5,000 gearcase bill. A quick fix now saves you from cursing on the water later.
My Key Takeaways
- Check First: Grab a flashlight and straightedge. Look for cracks where the skeg meets the gearcase—big red flag.
- Match the Fix: Epoxy for chips, skeg guard for small breaks, welding for anything major. Don’t DIY cracks.
- Cracks Are Serious: Even tiny ones can spread to the gearcase. Get a pro fast.
- Repairs Save Money: A $600 weld beats a $5,000 lower unit replacement any day.
Your Next Step
Head to your boat with a ruler and flashlight. Check your skeg, even if you think it’s fine—takes five minutes. Found damage? Use this guide to pick your fix. Your outboard’s the heart of your boat, and a healthy skeg keeps it beating. Treat it right, and you’ll cruise South Florida’s waters worry-free.
Author Bio
I’m Alex, a 15-year marine mechanic with ABYC certification, fixing outboards in Miami and Fort Lauderdale. I’ve repaired 300+ skegs, from Yamahas to Mercurys, and learned the hard way what works.
Leave a Reply