
Restoring Your Boat’s Metal with 3M Marine Metal Restorer and Polish: My 15-Year Guide
I’ve been wrenching on boats in South Florida for 15 years, from Miami marinas to Fort Lauderdale docks, and nothing transforms a vessel’s look like polished metal. Last June, a client named Carlos at Dinner Key Marina brought me his Sea Ray 230 with dull, chalky railings—saltwater had done a number on them. I grabbed my 3M Marine Metal Restorer and Polish, a microfiber cloth, and in two hours, those railings gleamed like new. Cost him $50 in materials versus $500 for a pro job. Here’s my guide to using this polish to fight oxidation, restore shine, and keep your boat looking sharp, based on hundreds of jobs I’ve tackled.
Table of Contents
Why Does Boat Metal Get So Dull?
Marine metal doesn’t just get dirty—it’s under constant attack from saltwater, sun, and humidity. I’ve seen stainless steel railings go from mirror-like to hazy in a single season. Understanding what you’re fighting is key to getting that showroom shine back.
What Causes Metal to Lose Its Shine?
- Oxidation: Oxygen reacts with metals like stainless steel, leaving a chalky, dull film. I’ve seen this on every boat from Key Biscayne to Stiltsville.
- Corrosion: Saltwater acts as an electrolyte, speeding up rust on steel or green patina on brass. Last summer, a client’s bronze cleat was so corroded it looked like a science project.
- Tarnish: Sulfur in the air and water darkens brass and copper, making fittings look grimy. A buddy’s yacht bell at Bahia Mar went from golden to black in a year.
Saltwater’s the worst culprit—it’s like a battery that never stops corroding. Add Miami’s 90% humidity and UV rays baking your boat, and unprotected metal doesn’t stand a chance.
How Does 3M Marine Metal Restorer and Polish Work?
This polish is a beast for marine environments. Its abrasive formula cuts through heavy oxidation and tarnish without scratching bare metal. I’ve used it on stainless steel railings, bronze propellers, and aluminum T-tops with zero issues. It’s not a sealant, but it leaves a smooth surface that resists future damage—think of it like prepping your metal for a wax shield.
Why I Trust 3M Marine Metal Restorer and Polish
I learned about 3M products from my mentor, Ray, a grizzled mechanic at Coconut Grove in 2009. He swore by their marine line, and after using it on a rusted-out Grady-White’s cleats, I was sold. This polish isn’t some generic cleaner—it’s built for boats.
What Makes This Polish Special?
- Marine-Specific Formula: It’s designed for saltwater’s harsh conditions, cutting through oxidation that car polishes can’t touch. I’ve seen it restore a 10-year-old bronze thru-hull in 20 minutes.
- Versatility: Works on bare stainless steel, brass, bronze, copper, chrome, and uncoated aluminum. I’ve polished everything from railings to engine parts with it.
- Long-Lasting Results: The smooth finish it leaves makes routine cleaning easier. A client’s Sea Ray stayed shiny for six months after one job last July.
It’s not perfect—deep pitting or scratches need mechanical sanding first—but for oxidation and tarnish, it’s my go-to. A $20 bottle lasts me a season, saving clients thousands compared to replacing hardware.

How Do I Prepare Metal for Polishing?
Preparation’s half the battle. I botched a job once in 2012 by polishing a dirty railing—ended up with scratches and a streaky mess. Never again. Here’s how I set up for a flawless finish.
Step 1: Clean Like Your Boat Depends on It
- Wash with a marine soap like 3M Marine Multi-Purpose Boat Soap. I scrub with a soft brush to get every bit of salt and grime off.
- Rinse thoroughly and dry with a microfiber cloth. Wet surfaces dilute the polish and mess up results.
- Check the metal type. This polish is for bare metal only—using it on painted or anodized surfaces will ruin them. I learned this the hard way on a client’s coated aluminum T-top.
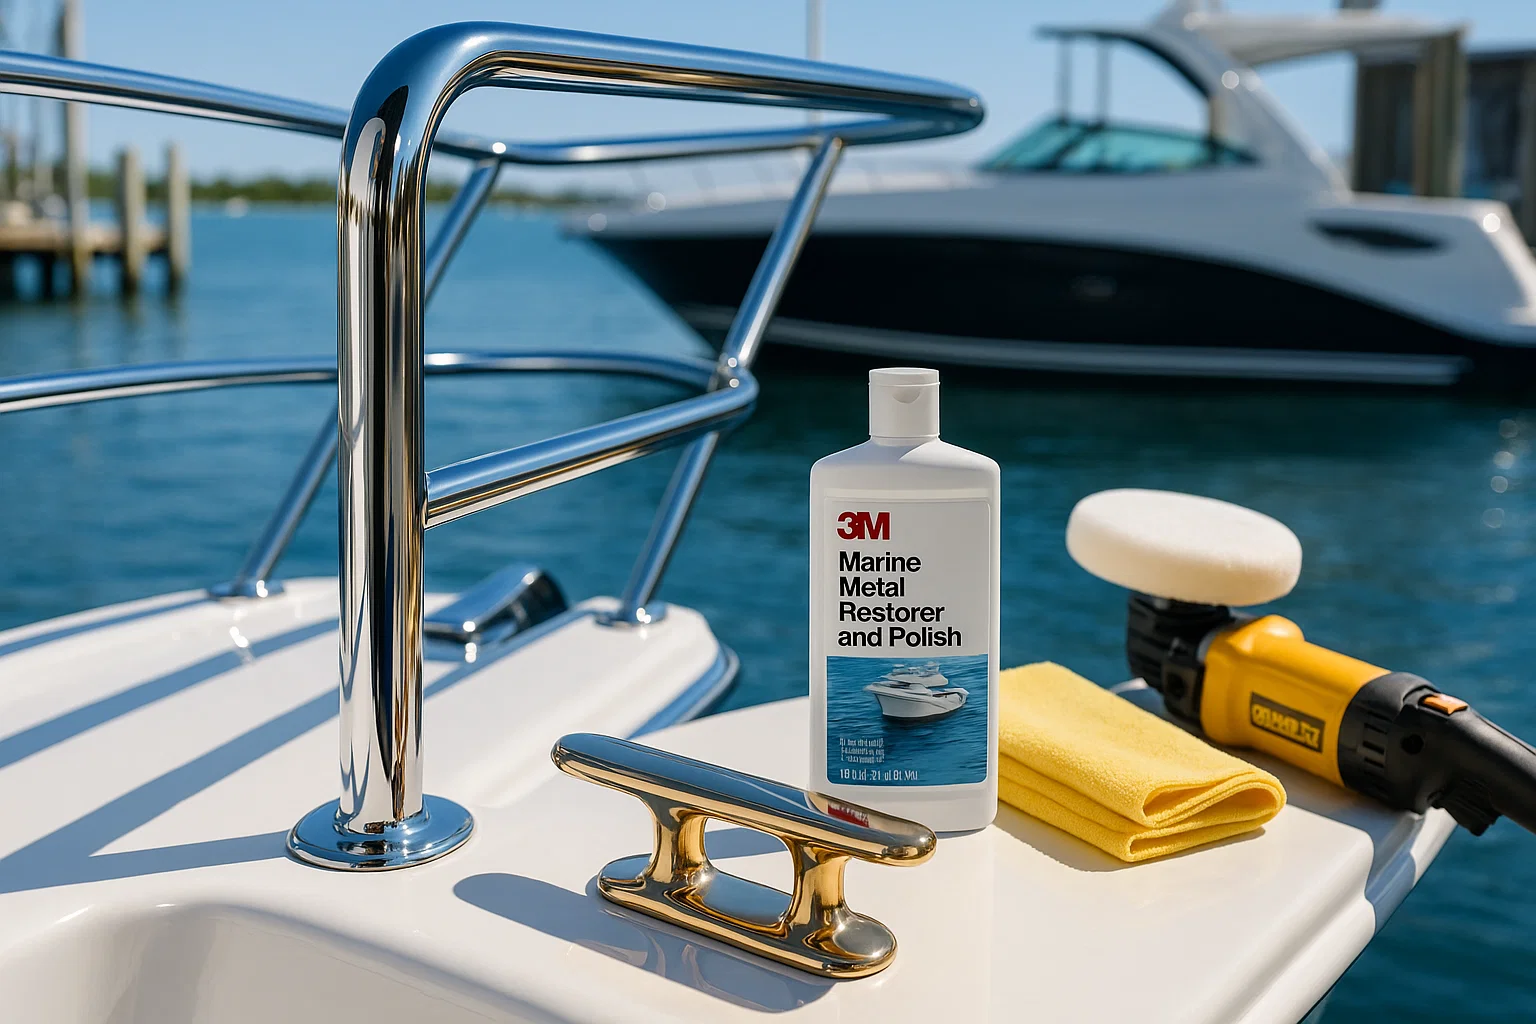
Step 2: Gather Your Gear
- Hand Polishing: Grab clean microfiber or cotton cloths. I keep a stash in my truck for small jobs.
- Machine Polishing: Use a buffer (1500–2500 RPM) with a wool or foam pad. I got a $200 DeWalt buffer that’s paid for itself ten times over.
- Safety: Work in a ventilated area—polish dust isn’t fun to breathe. Test on a small spot first, especially on brushed stainless, to avoid surprises.
Skipping prep is like painting over rust—you’ll regret it. A clean, dry surface is non-negotiable.
How Do I Use 3M Marine Metal Restorer and Polish?
Whether you’re polishing by hand or machine, the key is working in small sections—2’ x 2’ at most. I polished a Boston Whaler’s railings last month, and this method gave me a mirror finish in half a day.
Hand Polishing for Small Jobs
Perfect for cleats, fittings, or tight spots where a machine can’t reach.
- Dab a quarter-sized amount of polish onto a microfiber cloth. Less is more.
- Rub with firm, back-and-forth strokes—not circles—to avoid swirl marks. I press hard enough to feel the metal heat up slightly.
- Watch for black residue—that’s the polish lifting oxidation. It’s like seeing years of damage disappear.
- Buff off the residue with a clean cloth before it dries. Dried polish is a pain to remove and leaves streaks.
Machine Polishing for Big Surfaces
Great for railings, pontoons, or engine covers when you need speed.
- Apply a few drops of polish to a 2’ x 2’ section. Spread it with the pad before starting the buffer to avoid sling.
- Run the buffer at 1500–2500 RPM with light pressure, moving in overlapping patterns. I keep it slow to avoid overheating the metal.
- Ease off as the polish dries to burnish the surface for extra gloss.
- Wipe clean with a microfiber cloth right away. I missed this step once and spent an hour scrubbing dried polish off.
Pick hand polishing for precision, machine for efficiency. Either way, that black residue means the polish is working its magic.

What Mistakes Should I Avoid with 3M Marine Metal Restorer and Polish?
I’ve seen plenty of botched jobs—mostly from rushing or guessing. Here are the pitfalls I steer clear of after 15 years.
- Wrong Surfaces: This polish is abrasive, so it’ll wreck painted, anodized, or coated metals. I scratched a client’s coated cleat in 2010—$200 mistake.
- Letting Polish Dry: Buff it off while damp. Dried polish sticks like glue, and I’ve spent hours cleaning up that mess.
- Expecting Too Much: It won’t fix deep pitting or scratches. For those, you need sanding or professional restoration. I tell clients this upfront to avoid disappointment.
Pro Tips for a Showroom Shine
- Tight Spots: Use a toothbrush for crevices on cleats or fittings. I did this on a yacht’s bell last summer—perfect shine in 10 minutes.
- Brushed Stainless: Polish in the grain’s direction to keep the matted look. Cross-hatching looks awful.
- Stubborn Oxidation: Hit tough spots twice. I had a bronze propeller at Stiltsville that needed a second pass to gleam.
These tricks save time and make your boat look like it just left the showroom.
How Do I Protect Polished Metal Long-Term?
Polishing’s only half the job—keeping that shine is the real challenge. I learned this after a client’s railings dulled in three months because we skipped sealing.
How Often Should I Polish?
- Saltwater Boats: Polish 2–3 times per season. Miami’s humidity and salt hit hard.
- Freshwater Boats: Once a season usually does it, unless you’re out daily.
- Check Visually: When railings look hazy or fittings tarnish, it’s time. I check my Boston Whaler monthly.
Sealing the Shine
After polishing, apply a marine wax like 3M Marine Ultra Performance Paste Wax. I did this on a client’s Sea Ray last July, and it’s still shiny in January. Wax creates a barrier against salt, UV rays, and humidity, extending shine by months. Reapply every 3–6 months, depending on conditions.
Routine washing with marine soap, polishing when dull, and waxing seasonally keeps metal pristine. It’s a rhythm that saves you from costly repairs.

FAQ: Common Questions About 3M Marine Metal Restorer and Polish
What Metals Can I Use 3M Marine Metal Restorer and Polish On?
It’s safe for bare stainless steel, brass, bronze, copper, chrome, and uncoated aluminum. I’ve used it on railings, cleats, and propellers with great results. Don’t use it on painted or coated surfaces—it’ll strip them. Test a small spot first, like I did on a client’s T-top last month.
How Often Should I Polish My Boat’s Metal?
In saltwater, polish 2–3 times per season; in freshwater, once is enough. I check my boat monthly for dullness. A client at Key Biscayne polished his railings twice last summer and avoided $1,000 in replacements. Use visual cues to decide.
Can I Use a Machine Buffer with This Polish?
Yes, a buffer at 1500–2500 RPM with a wool or foam pad works great for large surfaces. I polished a pontoon boat in two hours last June using a DeWalt buffer. Spread polish before starting to avoid sling, and wipe residue immediately.
What’s the Best Way to Remove Stubborn Oxidation?
Apply polish twice to tough spots. I had a bronze propeller at Stiltsville that needed two passes to shine—10 minutes total. Use firm pressure and a toothbrush for crevices. If pitting’s deep, you’ll need sanding first.
How Do I Protect Polished Metal from Future Damage?
Seal with 3M Marine Ultra Performance Paste Wax after polishing. I waxed a client’s Sea Ray railings last July, and they’re still gleaming. Reapply every 3–6 months. Regular washing with marine soap helps too.
Why Does My Polish Leave Streaks?
You’re letting it dry too long. Buff it off while damp with a clean microfiber cloth. I made this mistake in 2012 and spent an hour scrubbing streaks off a railing. Work in small sections to stay in control.
Is 3M Marine Metal Restorer and Polish Worth the Cost?
A $20 bottle lasts a season and saves thousands in repairs. I restored a yacht’s fittings for $50 instead of $500 in replacements. It’s a no-brainer for any boater who cares about their vessel’s look.
Can Beginners Use This Polish?
Absolutely, if you follow instructions. I showed a buddy at Bahia Mar how to polish his cleats in 15 minutes—zero experience needed. Start small, test a spot, and don’t skip waxing. Try 3M’s website for tutorials: 3m.com/marine.
Conclusion: Make Your Boat Shine Like New
Polishing your boat’s metal with 3M Marine Metal Restorer and Polish is one of the most satisfying ways to boost its value and curb appeal. I’ve seen dull, corroded railings transform into mirror-like finishes in hours—it’s like giving your boat a new soul. Last summer, I helped a client at Coconut Grove save $1,500 by polishing his Sea Ray’s hardware instead of replacing it. With the right prep, technique, and follow-up wax, you can achieve that pro-grade shine yourself.
Walk your boat this weekend and pick one dull spot—maybe a cleat or railing. Grab a bottle of 3M polish, a microfiber cloth, and start small. Seeing that first gleam will hook you. Your boat’s character lives in those shiny details—restore them, protect them, and let your vessel stand out on the water.
Author Bio
I’m Alex, a 15-year marine technician based in South Florida, with ABYC certification since 2009. I’ve restored metalwork on 300+ boats, from Sea Rays to Boston Whalers, across Miami and Fort Lauderdale. My work’s saved clients thousands by avoiding unnecessary replacements.
Leave a Reply