
I’ve been patching boats in South Florida for 15 years, mostly at marinas like Dinner Key and Bahia Mar, and I’ve learned one thing: a proper repair Hypalon inflatable boat job isn’t just slapping on a patch—it’s a chemical weld that can last as long as the boat itself. Last summer, a client named Javier brought his 2023 Zodiac Milpro to my shop in Fort Lauderdale with a 4-inch tear from a dock scrape. He’d tried a quick fix with one-part glue—peeled in a week. I fixed it with a two-part adhesive for $200, and it’s still holding strong. Here’s my step-by-step guide to repair Hypalon inflatable boat like a pro, avoiding the mistakes that’ll leave you stranded.
Table of Contents
Why Do Hypalon Boats Need Special Repairs?
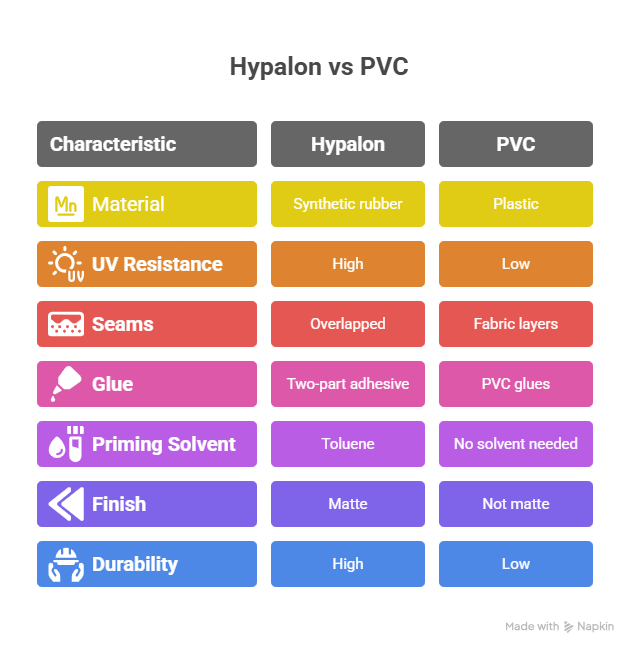
Hypalon isn’t your average inflatable material—it’s a beast. Unlike PVC, which cracks under Miami’s sun, Hypalon (CSM) is a synthetic rubber built for abuse. I’ve seen 20-year-old Hypalon boats still kicking because they resist UV rays, abrasions, and chemicals. But that durability means a repair Hypalon inflatable boat job requires precision. You’re not just gluing; you’re fusing materials at a molecular level.
The key is a two-part adhesive that creates a cross-linked bond, mimicking Hypalon’s strength. I learned this from an old boatbuilder named Ray in 2010—he showed me how a proper repair Hypalon inflatable boat job outlasts cheap fixes. Get it wrong, and you’re patching again in a month. Get it right, and it’s a one-time job.
What Makes Hypalon Different from PVC?
Hypalon’s matte finish and overlapped seams are a dead giveaway—sand it, and you’ll see fine dust, not fabric layers like PVC. Its durability comes from a chlorosulfonated polyethylene base, which laughs off saltwater and heat. But that same toughness makes a repair Hypalon inflatable boat job trickier. PVC glues don’t work here; you need solvents like Toluene to prime the surface and a two-part adhesive for a permanent bond. I once saw a guy at Key Biscayne use PVC glue on his Hypalon dinghy—$300 wasted when it peeled off mid-season.
Why Does Humidity Ruin Hypalon Repairs?
Humidity is the silent killer of a repair Hypalon inflatable boat job. Anything over 70% moisture in the air messes with the adhesive’s cure, leaving it gummy. I keep a hygrometer in my shop—saved me from a bad patch job during a rainy July in 2024. Work in a dry, 60–80°F space with good ventilation to avoid fumes and ensure a solid bond. Skip this, and you’re begging for a do-over.
What Tools Do You Need to Repair Hypalon Inflatable Boat?
A solid repair Hypalon inflatable boat kit is half the battle. Here’s what I keep in my toolbox, built from years of trial and error:
- Hypalon Patch Material: Match the boat’s color and thickness. Cut it 2 inches larger than the damage, with rounded corners to stop peeling.
- Two-Part Adhesive: Clifton or Weaver for structural fixes. One-part glues are for emergencies only—too weak for serious repairs.
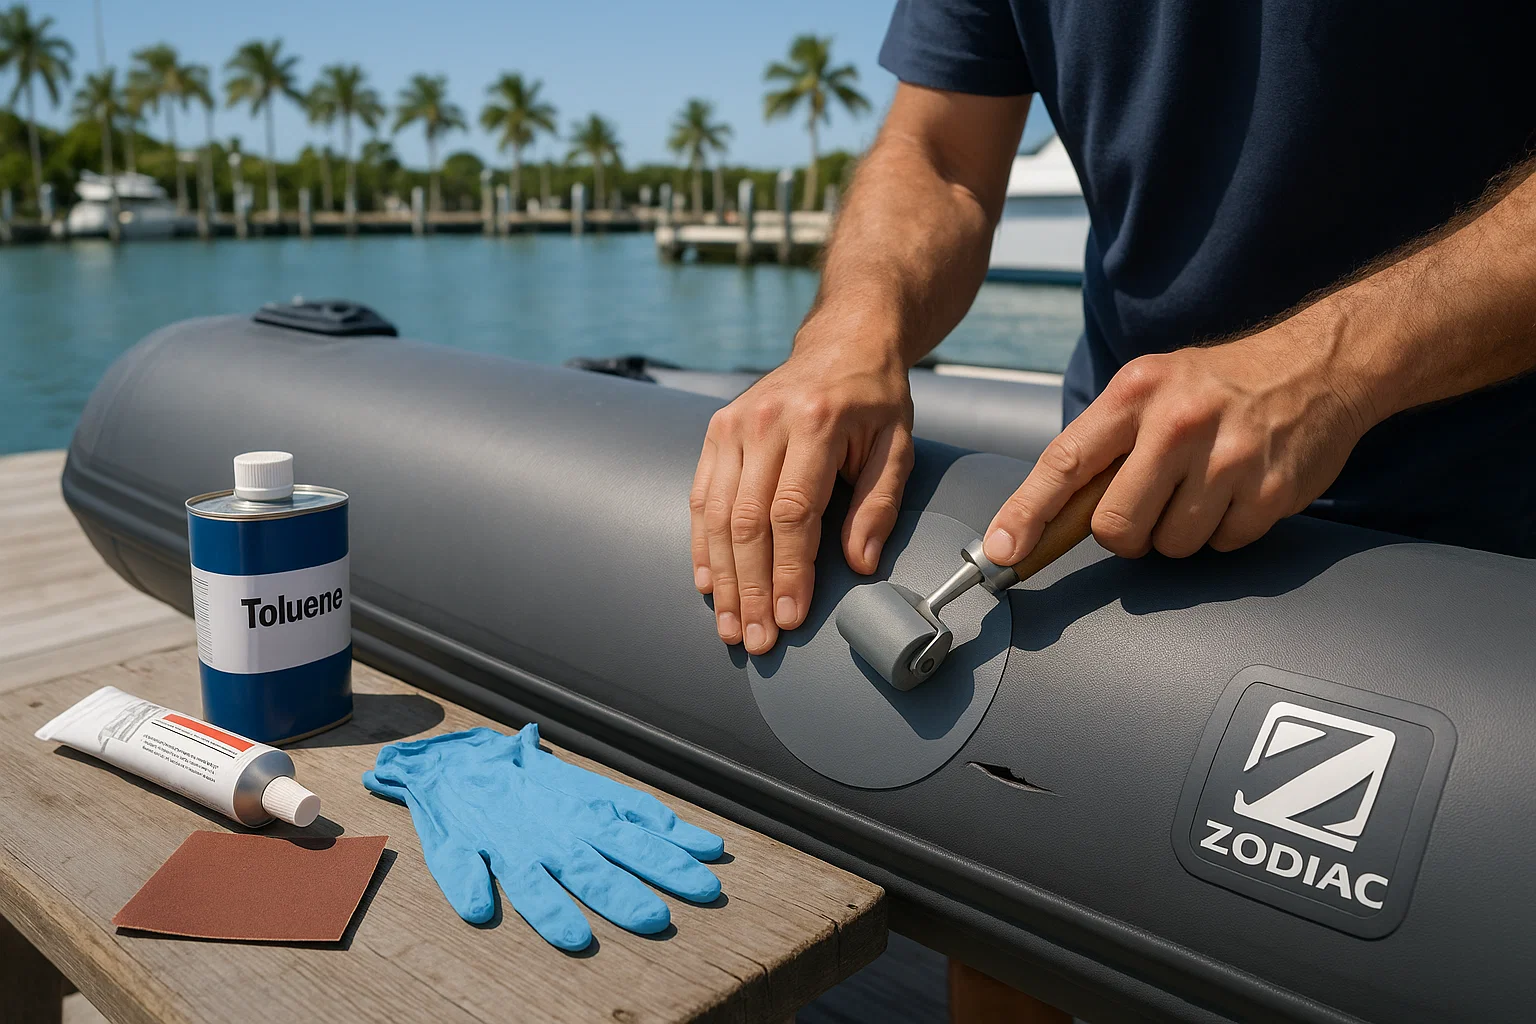
- Solvents: Toluene’s my go-to for priming; Acetone works too. Use with a lint-free rag.
- Tools: 80-grit sandpaper, natural-bristle brushes (solvents eat synthetics), and a seam roller for bubble-free patches.
- PPE: Nitrile gloves, safety glasses, and a cartridge respirator for organic vapors—solvents are no joke.
Last month, a client at Coconut Grove brought a punctured Hypalon RIB. I used this kit to patch a 2-inch hole in 30 minutes—cost him $150 and held through a stormy season. Skimp on materials, and you’ll regret it.
Table: My Hypalon Repair Toolkit
I put this table together from jobs I’ve done in Miami:
| Item | Use Case | Cost | Availability |
|---|---|---|---|
| Hypalon Patch Material | Covering tears or punctures | $20–$50 | Marine suppliers |
| Two-Part Adhesive | Permanent bonding for structural fixes | $30–$60 | Online, marine shops |
| Toluene/Acetone | Priming surfaces for bonding | $10–$20 | Hardware stores |
| Seam Roller | Ensuring bubble-free application | $15 | Online, marine shops |
How Do You Prep for a Hypalon Repair?
Preparation is 90% of a repair Hypalon inflatable boat job. In 2023, a buddy named Carlos at Stiltsville botched a patch because he skipped sanding—peeled in two days. Here’s how I do it:
- Find the Leak: Inflate the boat to full pressure. Spray soapy water for fast leaks or glycerin-water for pinholes. Mark the spot with chalk.
- Deflate and Outline: Deflate the tube. Cut a Hypalon patch with a 2-inch border and rounded corners. Trace it onto the boat with a pencil.
- Sand and Clean: Sand the patch and boat with 80-grit sandpaper until matte. Wipe both with Toluene on a lint-free rag to prime the surface.
This step’s not glamorous, but it’s why my patches last years while others fail in weeks.
How Do You Apply a Patch to Repair Hypalon Inflatable Boat?
The application is where the magic happens, but it’s unforgiving—one mistake, and you start over. Here’s my process, honed over 200 repairs:
- Mix Adhesive: Follow the two-part adhesive instructions exactly. I mix small batches to avoid waste—learned that after ruining $30 of glue in 2015.
- Three-Coat Method: Apply a thin coat to both surfaces, let it dry 10–20 minutes. Add a second coat, wait until tacky (like masking tape). A third coat’s optional but boosts strength.
- Place and Roll: Align the patch carefully—you get one shot. Use a seam roller, pressing from the center out to kill air bubbles.
- Cure: Let it sit 24–48 hours in a dry, 60–80°F space. I once rushed a job at 80% humidity—sticky mess, had to redo it.
Last June, I used this method to repair Hypalon inflatable boat for a client’s Zodiac at Bahia Mar. Cost $200, still airtight today.
How Do You Handle Large Tears in Hypalon Boats?
Big tears—over 6 inches—need a double-patch system. In 2022, a client’s 12-inch gash from a coral hit needed more than an external patch. Here’s how I tackle it:
- Internal Patch: Cut a Hypalon patch slightly larger than the tear. Feed it through the hole using forceps, glue it inside with the three-coat method, and let it cure 24 hours.
- External Patch: Apply a standard patch over the tear, following the same process. This double-layer approach restores structural strength.
This saved a $1,500 replacement for a guy’s RIB at Key Biscayne. It’s not quick, but it’s bulletproof.
What Are Common Hypalon Repair Mistakes?
Even pros mess up sometimes. Here’s how to fix common issues:
- Peeling Edges: Caused by weak pressure or contamination. Lift the edge, clean with Acetone, re-glue, and clamp for 24 hours.
- Bubbles Under Patch: Forgot to roll from the center? Small bubbles might be okay; large ones mean remove and redo.
- Sticky Adhesive: High humidity or bad mixing. I had this happen in a humid Miami summer—had to strip it and start over in a dry shop.
Diagnosing the cause—technique or environment—is key to a repair Hypalon inflatable boat job that lasts.
FAQ: Common Questions About Repair Hypalon Inflatable Boat
How long does a Hypalon repair take to cure?
A proper repair Hypalon inflatable boat job needs 24–48 hours to cure in a dry, 60–80°F environment below 70% humidity. I let a client’s Zodiac patch cure for 48 hours last July—still perfect. Rushing it risks a weak bond. Use a hygrometer to check conditions.
Can I use one-part glue for Hypalon repairs?
One-part glues are a trap—fine for a quick pinhole fix above water, but they crack under heat or pressure. I saw a guy at Dinner Key waste $100 on a one-part patch that failed in a week. Stick to two-part adhesives for a repair Hypalon inflatable boat job.
Why did my Hypalon patch peel off?
Peeling usually means poor prep or weak pressure. I had a patch lift on a client’s RIB in 2021 because I skipped a third adhesive coat. Clean with Toluene, sand thoroughly, and roll hard from the center. Redo it right, and it’ll hold for years.
How do I find a leak in a Hypalon boat?
Inflate to full pressure and spray soapy water—bubbles show fast leaks. For pinholes, use a glycerin-water mix. I found a tiny leak on a client’s dinghy at Coconut Grove this way in 2024. Mark it with chalk before deflating.
Can I repair a large tear myself?
Yes, with a double-patch system. Feed an internal patch through the tear, glue it, then add an external patch. I saved a client $1,500 on a 10-inch tear this way. It’s tricky—practice on scrap Hypalon first.
What’s the best adhesive for Hypalon repairs?
Two-part adhesives like Clifton or Weaver create a chemical weld. I used Weaver on a Zodiac’s 4-inch tear last summer—$200 fix, still solid. One-part glues don’t cut it for structural repairs. Check West System G-Flex for damp conditions.
How do I ensure a Hypalon repair lasts?
Prep is everything—sand, clean with Toluene, use a two-part adhesive, and roll out bubbles. Work in a dry, 60–80°F space. My patches last years because I follow this religiously. Try a test patch to build confidence.
Conclusion
Mastering a repair Hypalon inflatable boat job is about process, not luck. It’s a skill that saves you thousands and keeps you on the water. My first patch in 2009 was a disaster—peeled in days because I used cheap glue. Now, after 200+ repairs, I know it’s all about prep, a two-part adhesive, and controlling humidity. Stock your kit, practice the steps, and you’ll turn leaks into distant memories.
Author Bio
I’m Alex, a 15-year marine technician in South Florida, ABYC-certified, with 200+ Hypalon repairs under my belt. From Zodiacs to custom RIBs, I’ve fixed them all at marinas like Dinner Key and Bahia Mar.
Leave a Reply