
How to Repair Aluminum Boat Hull – A Mechanic’s Real Talk
I’ve been wrenching on boats down here in South Florida for over 15 years, and let me tell you, figuring out how to repair aluminum boat hull damage is one of those jobs that shows up way too often—especially after folks scrape bottom off Key Biscayne or bash into a dock at Bahia Mar. That sickening scrape? Yeah, I’ve heard it from owners more times than I can count. But here’s the thing: a dent, puncture, or leaky rivet doesn’t have to mean big bucks at the shop or a lost season. With some know-how and elbow grease, you can handle how to repair aluminum boat hull issues yourself, making it strong as new. This ain’t about slapdash patches that fail in a month—it’s practical advice from jobs I’ve done, like patching up Ray’s Alumacraft after he hit a log last summer in Biscayne Bay. We’ll break down strategies, prep, execution, and testing, all tailored to our humid, salty marinas. How to repair aluminum boat hull starts with understanding the mess you’re in, so let’s dive in.
Table of Contents
Selecting the Right Repair Strategy: From Epoxies to Brazing
Picking the right way on how to repair aluminum boat hull damage is like choosing tools for a job—get it wrong, and you’re back at square one. It’s all about matching the fix to the hole size, your skills, and what you’ve got in the toolbox. No one method rules them all; it’s situational. I remember Sofia at Dinner Key last June—she had a dime-sized puncture on her Starcraft from a rogue piling. We went with epoxy, and it’s held tight through two seasons. But for bigger gashes? That’s when rivets or brazing come in. Drives me nuts when folks try epoxy on a structural tear and end up with leaks—I’ve fixed those mistakes plenty.
Method 1: The Epoxy & Patch for Minor Damage
This is my go-to for small stuff when teaching owners how to repair aluminum boat hull punctures. It’s straightforward, no fancy heat needed, and seals watertight if done right. Best for holes under a dime, hairline cracks you’ve stop-drilled, or seeping rivets. You’ll need marine epoxy like G/Flex or JB Weld MarineWeld, plus a small aluminum patch. The epoxy bonds and fills gaps, creating a tough seal. But don’t use it for big structural spots—it’s not metal-strong. Last fall, a guy named Carlos brought his Jon boat to Coconut Grove with a tiny leak; we epoxied it in under an hour, cost him $150, and he’s been fishing without issues.
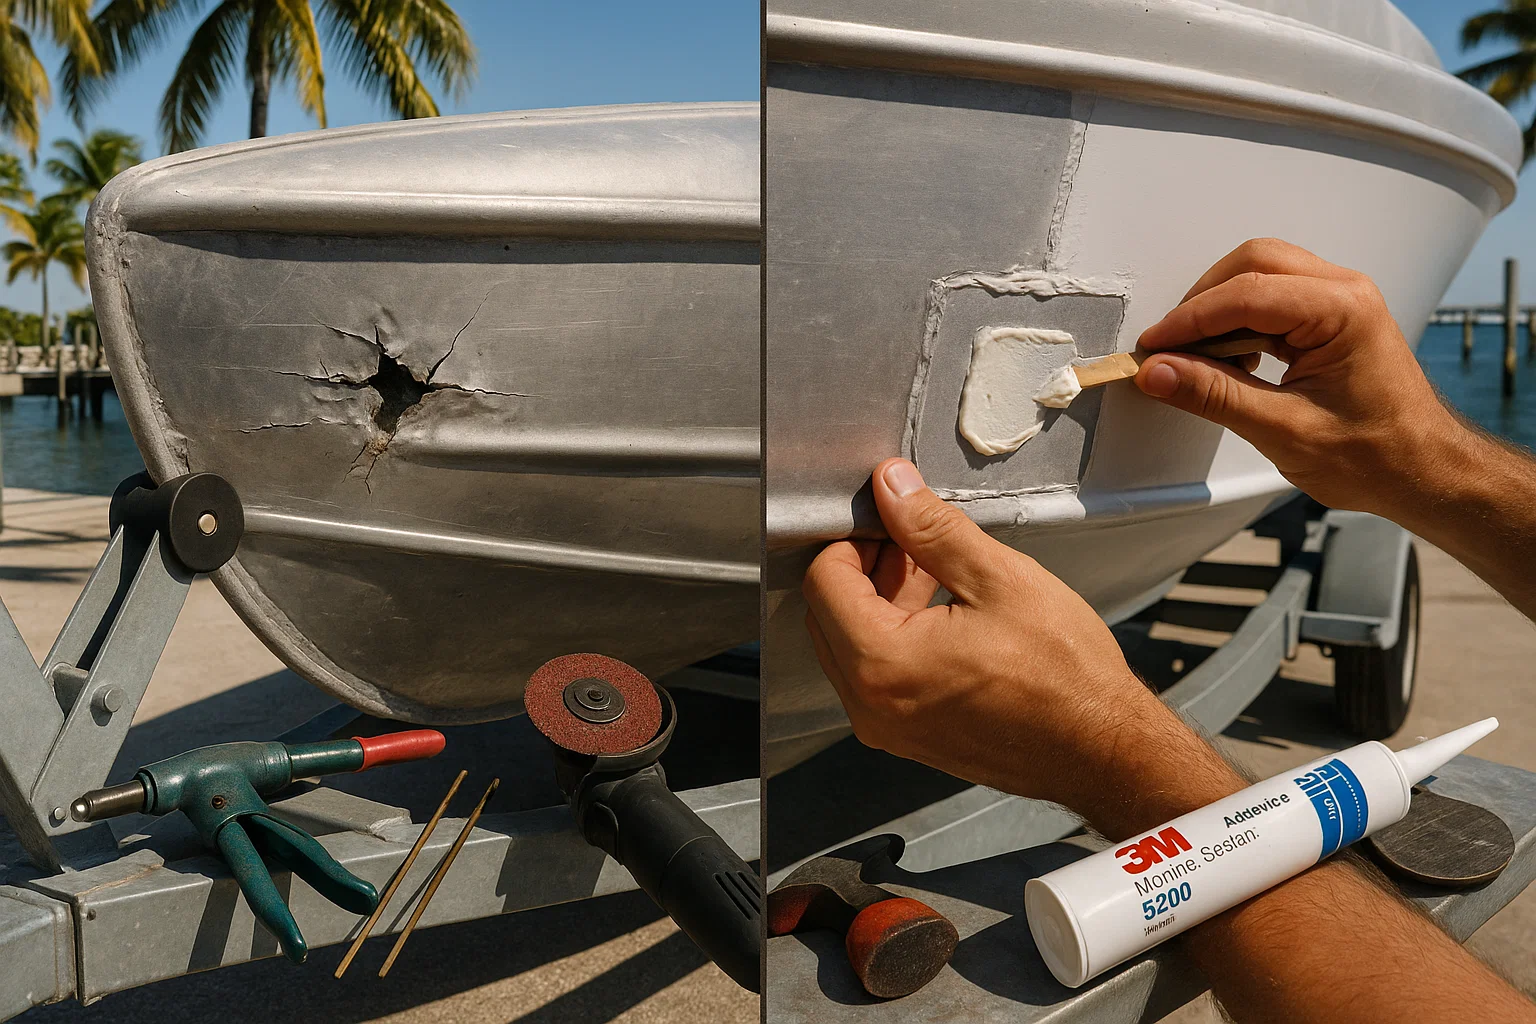
Method 2: The Rivet & Sealant Patch for Larger Holes
For bigger damage, mechanical fastening is key on how to repair aluminum boat hull holes that could compromise strength. Ideal for punctures up to a few inches or failed old patches. Grab matching aluminum sheet, a rivet gun, and 3M 5200 sealant— that’s the gold standard here in Miami’s humidity. Bed the patch in sealant, then rivet it down with sealed blind rivets to avoid future leaks. The pressure squeezes out a perfect seal. I put together this table from repairs I’ve done around Fort Lauderdale—helps compare options without guessing.
| Repair Method | Best For | Average Cost (South Florida) | Pros/Cons from My Jobs |
|---|---|---|---|
| Epoxy & Patch | Small punctures, rivet leaks | $100–$300 | Easy DIY, flexible—holds in salt but not for big stress. |
| Rivet & Sealant | Medium-large holes, structural areas | $200–$600 | Super strong, watertight—takes time but saved a tow once. |
| Low-Temp Brazing | Cracks, seamless fills without patches | $150–$500 | Metal bond, no warp risk—tricky heat control, practice needed. |
Method 3: Low-Temperature Brazing for a Near-Weld Finish
Brazing is that middle ground on how to repair aluminum boat hull cracks where you want a seamless metal bond without full welding gear. Great for medium holes or fills needing strength. Use rods like HTS-2000 or Super Alloy 5 with a MAPP torch. Heat control is the beast—warm the hull till the rod melts on contact, not from the flame. Practice on scrap first; I burned through a few pieces learning back in the ’90s. Javier’s Boston Whaler had a two-inch gash off Stiltsville last July—we brazed it for $400, and it’s still solid, no leaks.
Executing Your Repair: A Step-by-Step Walkthrough
Alright, strategy picked? Now the hands-on part of how to repair aluminum boat hull damage. Follow this, and you’ll avoid the failures I’ve seen—like patches popping off because prep was skimped. It’s methodical, but that’s what makes it last in our corrosive waters.
The Foundation: Flawless Surface Preparation
Prep is 90% of how to repair aluminum boat hull success—skip it, and you’re toast. Grind to bright, shiny aluminum with a wire wheel, extending two inches out. Sand with 80-grit for tooth, then degrease with acetone— no touching after. I always wear gloves; learned that after oils ruined a bond on a client’s SeaArk at Bahia Mar.

Applying a Riveted or Epoxy Patch
Shape your patch to overlap an inch, round corners. For rivets: Clamp, drill, apply 3M 5200, press till it oozes, then rivet with blinds. Epoxy: Mix, apply to patch and hull, clamp till cured. Ronnie’s rig leaked like crazy after a rock hit; we riveted it dockside at Key Biscayne—$250 fix that held.
Mastering the Brazing Technique
Pre-heat the hull gently, test rod contact— it should melt instantly. Fill the gap, brush clean while hot. Cool slow to avoid cracks. A tangent: I keep scrap aluminum in my truck for quick demos—saved a guy’s weekend once.
Finishing Touches: Curing, Painting, and Water-Testing
Patch done? Not yet. These steps lock in how to repair aluminum boat hull work against Florida’s salt and sun.
The Art of Patience: Understanding Cure Times
Epoxies and 5200 need seven full days—rush it, and it weakens. Brazing? Ready when cool. I tell folks to park the boat in shade; humidity here messes with cures.
Sanding, Painting, and Protection
Sand edges smooth with 220-grit, acetone wipe, then self-etching primer for aluminum. Top with marine paint. Looks pro and prevents corrosion.
The Final Check: The Leak Test
Always test dry—hose it or puddle-fill. Carla’s Alumacraft passed after our epoxy job last hurricane season; no drips, back on water same week.
Wrapping It Up
How to repair aluminum boat hull damage ain’t rocket science—it’s about method and patience. I’ve shared strategies from real jobs, like that time a puncture turned into a quick epoxy save. Match your fix, prep like crazy, execute clean, and test thoroughly. Shortcuts? They’ve cost me headaches, like redoing a brazed crack that warped from bad heat. If you’re tackling how to repair aluminum boat hull: Inspect first, gather tools, practice if brazing. Your boat’ll thank you, outlasting the docks at Coconut Grove.
FAQ – Quick Answers from the Dock
Folks hit me up with these at the marina constantly, so here’s straight talk from my wrenching days.
How often do I need to check my hull for damage?
Quarterly, more after rough waters. Caught a crack early on my own boat last year—saved a big how to repair aluminum boat hull job.
Can beginners handle how to repair aluminum boat hull with brazing?
With practice, yeah—but start on scrap. I’ve seen newbies warp metal; better learn slow.
What’s the top mistake in prep?
Not degreasing. Oils kill bonds—ruined a patch for a buddy off Stiltsville once.
Epoxy or rivets for a 2-inch hole?
Rivets for strength. Epoxy alone might flex too much in waves.
How long till I can launch after repair?
Seven days for sealants. Test first—don’t risk it.
Is painting necessary after how to repair aluminum boat hull?
Yeah, for corrosion protection. Skip it, and salt eats it quick in Miami.
Author Bio
I’m Alex, a 15-year marine technician in South Florida, ABYC-certified, with 200+ aluminum hull repairs under my belt. From patching punctures on Starcrafts and Alumacrafts to brazing cracks on Boston Whalers and custom rigs, I’ve handled dents, leaks, and gashes at marinas like Dinner Key and Bahia Mar, keeping boats afloat in our tough saltwater environment.