
I’ve been working on boats around Miami and Fort Lauderdale for over 15 years, and I’ve seen it all. But nothing, and I mean nothing, screams class and money like a perfectly laid teak deck. It’s the gold standard. When you see one done right, it’s a work of art. But I’ve also seen the flip side—jobs that look good for a season and then start lifting, cracking, and leaking. A bad teak job is more than an eyesore; it’s a fast track to rot and expensive structural repairs.
A lot of guys think about doing it themselves. They see the price tag from a professional yard and figure, “How hard can it be?” Well, it’s not rocket science, but it’s a craft that demands precision. One mistake at the beginning can ruin the whole project.
This isn’t going to be some manual you read online that was written by a guy who’s never held a caulking gun. This is what I’ve learned from watching the masters and, frankly, from fixing the disasters left by amateurs. We’ll cover everything from getting the subdeck right to the final sanding. So if you’re ready to do this, let’s get into what it takes to lay a deck that will last for decades.
Table of Contents
The Foundation: It All Starts with the Subdeck
You can buy the best teak in the world and the most expensive glue, but if your subdeck isn’t perfect, the whole job is garbage. It’s like building a house on a sand dune. It will fail. This is the single most important step, and it’s where I see people cut corners all the time.
First, you gotta strip everything off the old deck. Then, you inspect. Look for any soft spots, rot, or corrosion. Fix it. No exceptions. Then, you need to fair the surface until it’s dead flat. Any low spots will create voids under the teak where water can sit.
Once it’s faired, you sand the entire thing down with 60 or 80-grit paper. This gives the surface some “tooth” for the adhesive to grab onto. Then, you vacuum. And then you vacuum again. I once saw a guy at a yard in Dania Beach do a whole deck without a proper vacuum job. Tiny dust particles were left behind. His brand-new teak deck started getting hollow spots and lifting within a year because the epoxy didn’t get a clean bond. It cost him double to fix it.
The final step is the primer. I use stuff like Sika’s Primer-290 DC. You put on a thin, even coat. Don’t slop it on. It needs to dry for at least 30 minutes, but you have up to 24 hours to start laying the deck. This primer is the chemical handshake between your subdeck and the adhesive. Don’t skip it.
Two Ways to Build: Planks or Panels?
You’ve got two main ways to go about this: laying individual planks one by one, or using prefabricated panels. I’ve done both, and they each have their place. When a customer asks me which way to go, here’s the breakdown I give them:
| Feature | Plank-by-Plank | Prefabricated Panels |
|---|---|---|
| Customization | Total freedom. Perfect for complex curves and custom designs. This is true artistry. | More limited. Best for large, flat areas. |
| Installation Speed | Slow and meticulous. You’re cutting, fitting, and gluing one piece at a time. | Much faster. You’re laying down large sections at once. |
| Consistency | The gaps and caulk lines depend entirely on your skill. Can be inconsistent if you’re not a pro. | Perfectly uniform seams and caulk lines, since they’re made in a controlled shop environment. |
| DIY-Friendliness | Not for beginners. The learning curve is steep. | More forgiving for a skilled DIYer, but still demands precision. |
| My Take | This is the old-school, master craftsman way. I love the look, but it’s a ton of work. | For most production boats, this is the smart, efficient choice. The quality control is excellent. |
The Sticking Point: Adhesives and Bonding
Your choice of adhesive is critical. For most jobs, a good one-part polyurethane like Sikaflex-298 is fine. It’s flexible and strong. But for high-stress areas or for guys who want a bombproof, no-compromise bond, I reach for a two-part epoxy. It’s more of a pain to mix and has a shorter working time, but once it cures, that teak is never coming up.
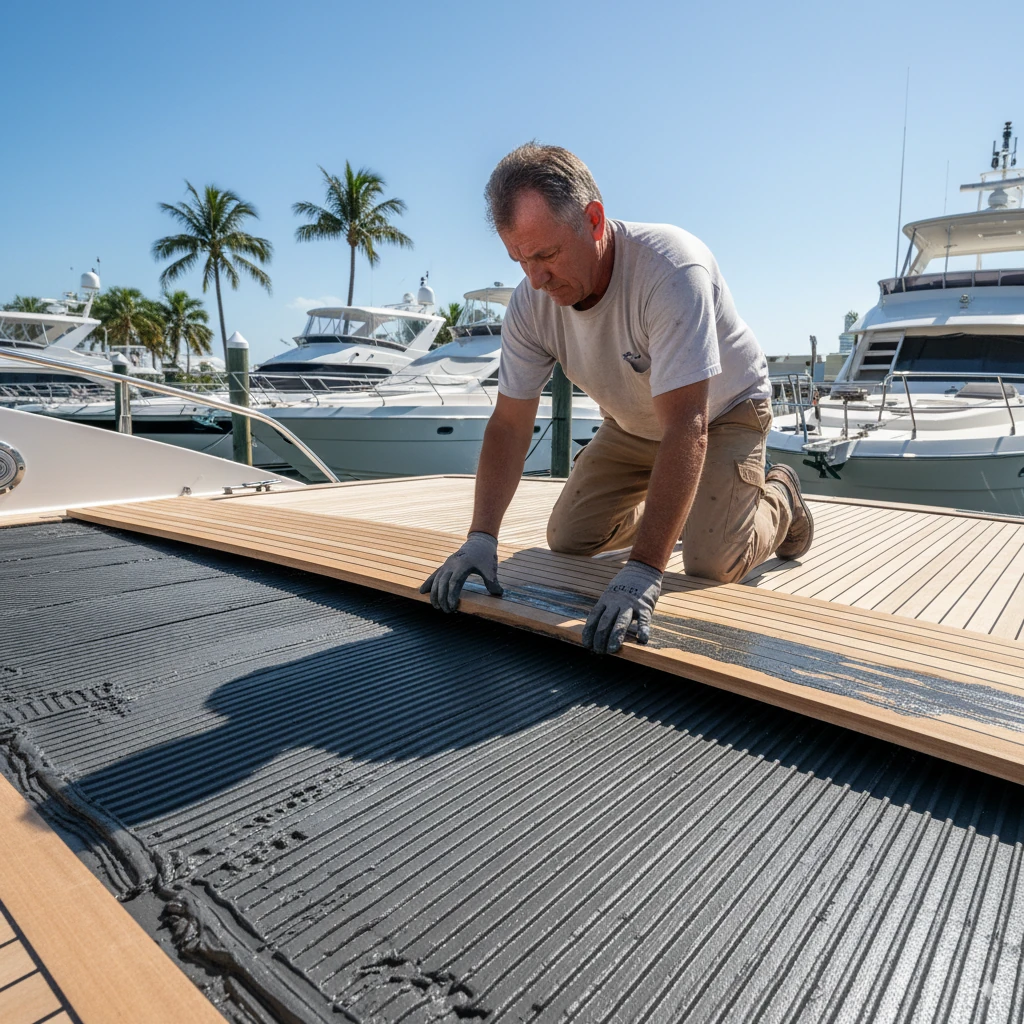
Application is key. I use a 4mm V-notched spreader. This creates perfect, uniform ridges of adhesive. When you press the teak down, those ridges flatten out and spread to create a solid bed with no voids. Voids are your enemy. They trap air and moisture.
A trick I learned from an old-timer in Key Biscayne: dry-fit everything first. Everything. Lay out all your planks or panels, number them, make sure they fit perfectly before you even think about mixing up a batch of adhesive. It saves so many headaches.
The Black Lines: Caulking Like a Pro
Now for the part everyone sees—and where most DIY jobs fail: the caulking. Those perfect black lines are not just for looks; they are the watertight seals that protect your subdeck.
You have to use a proper marine-grade, UV-resistant caulk like Sikaflex-290 DC PRO. Don’t even think about using hardware store silicone. It will fail. Use a good caulking gun, preferably a pneumatic one if you’re doing a big job, to fill the seams completely. You want to slightly overfill them.
And here is the most important rule of caulking, and I’ll shout it from the rooftops: DO NOT SAND IT FOR AT LEAST A WEEK. I’ve seen guys get impatient. They wait a day or two, see that it’s firm to the touch, and hit it with a sander. Big mistake. The caulk isn’t fully cured deep down. They end up smearing a thin black film all over their beautiful new teak. It’s a nightmare to clean up. You have to wait for it to fully cure, all the way through. Be patient.
The Final Finish and Long-Term Care
Once the caulk has cured, it’s time for the final sanding. This is a multi-step process. Don’t try to get it all done with one grit.
- Level Sanding: Start with a coarse grit, like 36 or 40-grit, on a fairing board or long-board sander. Your goal here is to get all the planks perfectly level with each other and sand down the excess caulk.
- Smoothing: Move up to a 60-grit, then an 80-grit paper with a random orbital sander. This removes the coarse scratches and leaves you with that smooth, non-slip finish that feels great under your bare feet. Don’t go any finer; you don’t want it to be slippery when wet.
- Detailing and Sealing: After the final sanding, vacuum everything meticulously. Remove any temporary screws you used. Now, here’s a pro step that many people miss: seal any exposed end-grains of the teak, like around hatches or deck fittings, with epoxy. This prevents water from wicking into the wood.
Maintenance is simple: clean it with gentle soap and water. Never, ever hit it with a pressure washer—it will tear up the soft grain of the wood and destroy your deck. If you take care of it, a properly laid teak deck will outlast the boat.
Your Questions Answered: Dockside FAQ
Can I just use a cheaper wood like pine or something else?
No. Teak is the standard for a reason. It’s naturally loaded with oils that make it incredibly resistant to rot and water. Using a cheaper wood is asking for trouble. It will rot from the inside out, and you’ll be tearing it all up in a few years. Don’t do it.
I found a cheaper adhesive at the hardware store. Is marine-grade stuff really worth it?
Yes, 100%. Marine adhesives are designed to stay flexible while maintaining an incredible bond, even with the constant movement of a boat and extreme temperature swings we get here in Florida. A cheaper adhesive will get brittle and fail, letting water get under your deck. That’s how you get rot. The adhesive is not the place to save a few bucks.
Should I seal my new teak deck with a varnish or sealer?
This is a huge debate. Personally, I advise against it for decks. A natural, “bare” teak deck provides the best non-slip surface. Sealers and varnishes look great at first, but they require constant maintenance, and they can make the deck dangerously slippery when wet. Let it weather to a natural silver-gray. A light sanding once a year will bring it back to new if you want.
How long will a properly laid teak deck really last in South Florida?
With the process I just laid out and basic, gentle cleaning? A good 20-25 years, easy. I’ve seen 30-year-old decks that are still in great shape. It’s all about that initial prep work and using the right materials. The sun is brutal, but a good deck can take it.
What’s the absolute number one mistake that ruins a DIY teak deck job?
Rushing the caulking cure time. It happens all the time. Someone spends weeks prepping and laying the wood perfectly, then gets impatient and sands the caulk after two days. They smear black residue all over the deck, try to clean it with harsh chemicals, and ruin the finish. Patience is a tool. Wait the full week. It’s worth it.
Leave a Reply