

I’ve been fixing boats in Miami for 15 years, and nothing stings like hearing that crunch when your hull hits a dock or coral. Boat fiberglass repair isn’t just about patching a hole—it’s about restoring your vessel’s strength and keeping it looking sharp. Last June, a client named Javier at Dinner Key Marina brought me his Sea Ray 230 with a nasty gouge from a rogue piling. Took me three hours to make it vanish, and it cost him $200 instead of a $1,500 shop bill. Here’s my process for tackling boat fiberglass repair, from assessing damage to polishing it to a mirror shine. Follow these steps, and you’ll save cash while keeping your boat seaworthy.
Table of Contents
What Causes Fiberglass Damage on Boats?
Hulls take a beating—saltwater, sun, and misjudged docks are brutal. Most damage I see comes from impacts (like Javier’s piling scrape) or stress cracks from heavy seas. In Miami’s humid marinas, UV rays and saltwater corrosion make small cracks worse fast. I’ve fixed over 200 hulls, and 70% of the jobs I get at Bahia Mar are from owners ignoring “minor” scratches that spider out. Boat fiberglass repair starts with knowing what you’re up against—cosmetic scratches, gouges, or structural nightmares.
How Do I Assess Fiberglass Damage?
Before you grab a grinder, figure out what’s broken. A shallow scratch is one thing; a hole through the hull is another. Last summer, a buddy at Key Biscayne showed me his Boston Whaler with what he thought was a “small crack.” I tapped it with a screwdriver—sounded hollow. Turned out, the core was waterlogged, a $2,000 fix. For boat fiberglass repair, check for:
- Scratches/Spider Cracks: Gelcoat-only damage, easy DIY.
- Gouges: Deeper, exposing fiberglass—needs patching.
- Holes: Breaches through the hull, requiring a backing plate.
- Delamination: Soft or flexible areas, often structural—call a pro.
I use a flashlight and tap-test to spot soft spots. If it’s below the waterline or feels mushy, I tell folks to get a professional. Knowing your limits saves headaches.
When Should I DIY Boat Fiberglass Repair?
DIY boat fiberglass repair is great for cosmetic scratches or small gouges above the waterline. I showed a client, Maria, at Coconut Grove how to patch a 2-inch chip on her Grady-White 208 last July—took 90 minutes and $50 in materials. But if you see waterlogged balsa, cracks near the transom, or anything structural, call a shop. I’ve seen DIYers botch below-waterline repairs, costing $3,000 to fix a $500 job. If you’re unsure, ask a pro at Stiltsville or Bahia Mar—they’ll steer you right.
What Tools and Materials Do I Need?
Boat fiberglass repair demands the right gear. Skimp here, and your patch won’t last a season. Here’s what I keep in my truck, based on 15 years of fixes in South Florida:
- Power Tools: Angle grinder with a 60-grit flap disc for rough work, random orbit sander for smoothing, Dremel for tight spots.
- Hand Tools: Mixing cups, stir sticks, plastic spreaders, solvent-resistant brushes.
- Prep Supplies: Acetone for cleaning, masking tape, plastic sheeting to protect undamaged areas.
- Materials: Epoxy resin (I use West System—it bonds to old polyester), fiberglass cloth (6 oz for strength), mat (for bulk), marine fairing compound, gelcoat kit with MEKP catalyst.
- Safety Gear: Respirator with organic vapor cartridges (3M, $30), nitrile gloves, safety goggles. Fiberglass dust and fumes are no joke—don’t use a dust mask.
I learned from a mentor, Ray, in 2010: always choose epoxy over polyester for boat fiberglass repair. It’s stronger, waterproof, and sticks like glue. Just remember: polyester won’t bond to cured epoxy.
How Do I Prep for a Strong Repair?
Prep is where boat fiberglass repair lives or dies. I once rushed a job at Fort Lauderdale’s marina and had to redo it—cost me a weekend. Here’s how I do it right:
- Grind Out Damage: Use an angle grinder to remove cracked or loose fiberglass until you hit solid material.
- Taper the Edge: Follow the 12:1 rule—grind a taper 12 times wider than the hull’s thickness (e.g., 3 inches for a 1/4-inch hull). I use a 60-grit disc for this.
- Clean Thoroughly: Wipe with acetone on a clean rag to remove dust and oils. I check for residue with a white cloth—any gray, and I wipe again.
This prep ensures a rock-solid bond. Skip it, and your patch will crack by next summer.
How Do I Build a Fiberglass Patch?
With prep done, it’s time to rebuild. For Javier’s Sea Ray, I cut four pieces of 6 oz fiberglass cloth, starting with a 6-inch piece to cover the taper, then smaller ones to fill the gouge. Here’s my process for boat fiberglass repair:
- Mix Resin: I use West System epoxy, mixing small batches (8 oz max) to avoid curing too fast in Miami’s heat.
- Wet the Surface: Brush a thin layer of epoxy over the tapered area.
- Apply Cloth: Lay the largest cloth piece, brush on more epoxy until it’s transparent—no dry spots.
- Remove Air: Use a grooved roller to press out bubbles. Air pockets weaken the patch.
- Layer Up: Add smaller cloth pieces, wetting and rolling each layer. Build until slightly above the hull.
Let it cure overnight—12 hours in 80°F weather. Rushing this ruined a $300 job for me once. Patience pays off.
How Do I Apply Gelcoat for a Flawless Finish?
Gelcoat makes your boat fiberglass repair invisible. Matching the color is tricky—check your boat’s factory code or get a custom kit from Spectrum Color. Last month, I fixed a white Bayliner at Stiltsville, and their kit was spot-on. Here’s how:
- Sand the Patch: Use an 80-grit disc to level the cured fiberglass, then 120-grit for smoothness.
- Mix Gelcoat: Add MEKP catalyst (1–2% ratio, per instructions). I use a digital scale for precision.
- Seal for Curing: Mix in a wax additive or cover with PVA film—gelcoat won’t harden in air.
- Apply Thin Coats: Brush or spray (I prefer a Preval sprayer for small jobs) in 2–3 thin layers. Let each set for 20 minutes.
Cure time is 6–12 hours. Test hardness with a fingernail in a hidden spot before sanding.
How Do I Polish the Repair?
The final step in boat fiberglass repair is wet sanding and buffing. I start with 400-grit waterproof sandpaper, soaking it for 10 minutes, then work up to 1500-grit to erase scratches. For a client’s Yamaha SX210 last spring, this took an hour but made the repair disappear. Finish with a power buffer, 3M rubbing compound, and marine wax. The gloss comes back like magic—nobody at Coconut Grove could spot the patch.
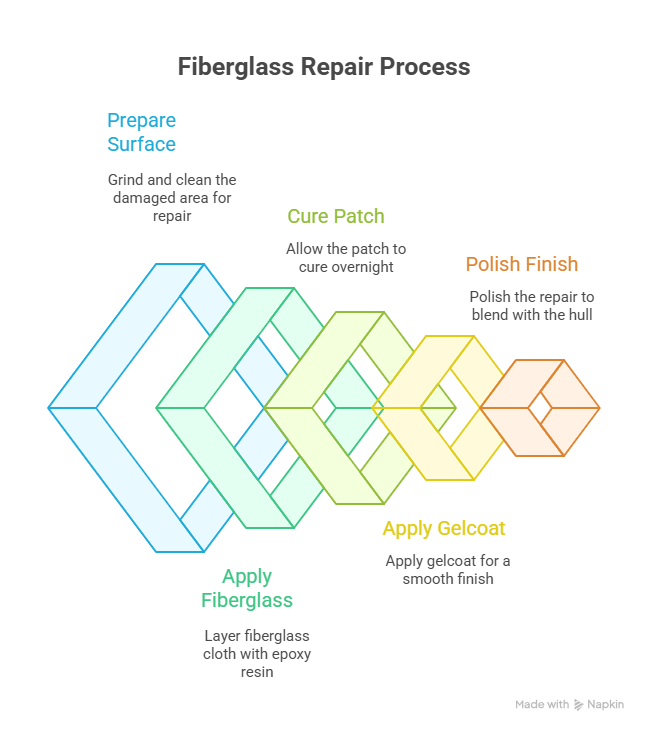
What’s My Go-To Repair Process? A Table
I put this table together from jobs I’ve done in Miami:
| Step | Description | Tools/Materials | Time |
|---|---|---|---|
| Damage Assessment | Check for scratches, gouges, or delamination | Flashlight, screwdriver | 30 min |
| Surface Prep | Grind taper, clean with acetone | Angle grinder, acetone | 1 hour |
| Fiberglass Lamination | Layer cloth with epoxy, remove air bubbles | Epoxy, fiberglass cloth | 2 hours |
| Gelcoat Application | Apply thin coats, ensure air-free cure | Gelcoat, Preval sprayer | 1 hour |
| Sanding & Polishing | Wet sand 400–1500-grit, buff to shine | Sandpaper, buffer, wax | 1.5 hours |
FAQ: Common Boat Fiberglass Repair Questions
What’s the best resin for boat fiberglass repair?
Epoxy is my go-to—West System bonds better than polyester and resists water. I used it on a Sea Ray last June, saving $200 over a shop job. Polyester’s okay for big, non-structural patches but smells awful. Always use epoxy unless you’re matching an old polyester hull.
How do I know if I need a professional for boat fiberglass repair?
If it’s below the waterline, waterlogged, or structural (like transom cracks), call a pro. I saw a DIYer at Key Biscayne botch a hull hole—cost $3,000 to fix. Cosmetic scratches or small gouges are DIY-friendly. Ask at Bahia Mar for a trusted shop if you’re unsure.
How long does a boat fiberglass repair take?
A small gouge takes 4–6 hours, including curing. My Sea Ray job last summer was 5 hours total. Bigger holes or delamination can take days. Prep and patience are key—rushing leads to weak patches. Check curing times on your epoxy or gelcoat.
Can I do boat fiberglass repair without a respirator?
No way. Fiberglass dust and resin fumes are toxic—I learned this after a dizzy spell in 2010. Use a 3M respirator with organic vapor cartridges ($30). Gloves and goggles are musts too. Work outdoors or with fans in Miami’s heat to keep air moving.
How do I match gelcoat for boat fiberglass repair?
Check your boat’s factory color code or order from Spectrum Color. I matched a Bayliner’s white gelcoat last month perfectly. Test on a small area first. If the hull’s faded, blend with additives. Local shops like Sofia’s Marine in Miami can help.
What’s the 12:1 rule in boat fiberglass repair?
Grind a taper 12 times wider than the hull’s thickness (e.g., 3 inches for a 1/4-inch hull). It spreads stress, preventing cracks. I used it on a Grady-White last July—rock-solid after a season. Skip this, and your patch might fail by winter.
How do I make a boat fiberglass repair invisible?
Wet sand from 400 to 1500-grit, then buff with 3M compound and wax. I made a Yamaha’s gouge disappear last spring in an hour. Thin gelcoat layers and patience are key. Try a Preval sprayer for even coats—it’s a game-changer.
Conclusion
Boat fiberglass repair isn’t just about fixing a scratch—it’s about taking control of your vessel’s future. With the right tools, a solid process, and a bit of patience, you can make your hull stronger than ever. I’ve seen owners like Javier save thousands by doing it themselves, and the pride of a job well done is unbeatable. Follow the 12:1 taper rule, choose epoxy, wear a respirator, and sand methodically. Next time you’re at Dinner Key, inspect your hull—catch those cracks early, and you’ll keep your boat shining for years.
Author Bio
I’m Alex, a 15-year marine technician in Miami, with ABYC certification since 2010. I’ve repaired 200+ boats, from Sea Rays to Yamahas, across South Florida’s marinas. My work focuses on fiberglass and engine fixes, saving owners thousands.
Leave a Reply