
Key Takeaways
Preparing your boat for a new inboard motor is a game of precision and patience. Before the engine is ever lowered into place, a series of foundational steps must be executed perfectly to ensure a safe, reliable, and vibration-free installation. Get these core preparations right, and you’re setting the stage for years of trouble-free performance on the water.
- Prioritize structural integrity. Before you begin, tap your engine stringers with a mallet; a dull thud signals hidden rot that must be repaired for a safe foundation.
- Create waterproof mount points. For ultimate durability, over-drill mount holes, fill them with thickened epoxy, then re-drill to create compression-resistant, waterproof sleeves.
- Master the drivetrain alignment. Your most critical goal is ensuring the engine and prop shaft couplings are perfectly parallel and concentric to eliminate destructive vibration.
- Design a fail-safe exhaust. Ensure your wet exhaust has a continuous downward slope from the engine to the hull to prevent catastrophic water backflow into the cylinders.
- Perform a mandatory “dry fit”. Before final installation, lower the engine into place to confirm you have clear access to all service points like oil filters and belts.
- Align your engine in the water. The final, most precise alignment must be done after the boat has floated for 24+ hours, as the hull shape changes once waterborne.
These critical preparations are what separate a professional-grade installation from a project plagued by problems. Dive into the full guide to master each step.
Introduction
The most critical part of installing a new inboard motor happens long before that engine is ever lowered into the boat.
While the dream is a smooth, powerful, and reliable new powerplant, that outcome is determined entirely by the prep work you do now. It’s the meticulous effort in an empty engine bay that separates a successful repower from a project plagued by vibration, misalignment, and costly, frustrating failures.
Rushing this stage is a recipe for disaster. But getting it right ensures your significant investment pays off with years of trouble-free performance.
This guide provides the essential, step-by-step framework for that preparation. We’ll walk through the non-negotiable tasks that create a bulletproof foundation for your new engine:
- Clearing, cleaning, and assessing the engine space
- Building or repairing the engine beds for structural integrity
- Establishing a perfectly aligned drivetrain centerline
- Integrating the supporting fuel, exhaust, and electrical systems
Think of this as the professional’s checklist before the main event. Each step builds on the last, guaranteeing your new motor has the secure and reliable home it deserves.
We’ll begin with the absolute groundwork: preparing the operating room for surgery.
Foundational Prep: Clearing, Cleaning, and Assessing the Engine Space
This initial phase is about creating a safe, clean, and structurally sound environment for your new motor. Think of it as preparing the operating room before surgery.
Skipping these steps can lead to installation errors, safety hazards from fuel residue, and long-term damage that compromises the entire project.
The Decommissioning Process
Start by properly disconnecting and removing the old engine if one is present. This is your chance to create a totally clean slate for the new power plant.
- Label everything. Carefully tag all wires and hoses before removal to avoid confusion later, even if you plan to replace them. A little organization now saves hours of guesswork.
- Remove incompatible components. Systematically clear out old exhaust systems, fuel lines, wiring harnesses, and control cables that won’t work with the new engine.
- Assess related hardware. This is the perfect time to inspect through-hulls and seacocks, planning for replacement if you see any signs of corrosion or wear.

Deep Cleaning for Safety and Precision
A pristine engine compartment is non-negotiable. It’s the only way to work safely and spot problems before they get buried under a new engine.
Use a quality marine degreaser to cut through years of accumulated grime. A clean surface makes it far easier to spot hidden structural issues like hairline cracks in the fiberglass or delamination. It also ensures new sealants and bonding agents will adhere perfectly.
Structural Integrity Check
With the area clean, you can perform a thorough inspection of the engine beds or stringers—the structural beams the engine sits on.
Tap the stringers firmly with a plastic mallet, listening for any change from a sharp “rap” to a dull “thud.” A dull sound often indicates rot or delamination inside the fiberglass. Probe any suspect areas with an awl; the structure must be completely solid. Check where the stringers are tabbed to the hull for any separation. Any weakness here must be professionally repaired before you proceed.
This foundational prep work isn’t just cleanup; it’s the most critical step in ensuring your new inboard motor has a secure and reliable home for years to come.
Building a Rock-Solid Platform: Preparing Engine Beds and Mounts
The engine’s immense power and torque are transferred directly to the boat through its mounts and beds. Think of this as the chassis for your powerplant—it must be an unwavering foundation robust enough to handle intense forces without flexing or failing.
An engine is only as good as the platform it sits on.
Understanding Engine Bed Requirements
The design of your engine beds is non-negotiable and dictated by physics. They must be perfectly engineered to support the new motor.
- Distribute Force: The beds spread the engine’s static weight and dynamic torque across a wide, strong section of the hull.
- Maintain Rigidity: They must be perfectly parallel to the boat’s centerline and strong enough to prevent any twisting or movement under load.
- Set the Angle: The bed’s height is determined by the required propeller shaft angle and the new engine’s dimensions. Accurate measurement is critical here.
Repairing or Constructing New Beds
With the requirements clear, inspect your existing stringers. If there’s any doubt about their integrity, it’s time for serious work.
For damaged stringers, you must grind away all compromised material back to clean, solid fiberglass and wood. There are no shortcuts.
New beds are typically built from marine-grade plywood or specialized composites. They are then heavily encapsulated in multiple layers of fiberglass and securely tabbed to the hull, creating a single, powerful structure.
Preparing for the New Mounts
The engine mounts are the final connection points, and their placement must be exact.
- Mark the Locations: Use the manufacturer’s installation template to precisely mark the bolt hole locations on your new beds.
- Drill with Precision: Drill the holes, ensuring they are perfectly perpendicular to the bed’s surface for even load distribution.
- Seal the Core: A pro-level best practice is to over-drill the holes, fill them with thickened epoxy, and then re-drill to the final bolt size. This creates a waterproof, compression-resistant sleeve inside the stringer.
- Seal the Mounts: Always apply a high-quality marine sealant under the mounts before the final torquing to prevent any water intrusion.
Building a flawless foundation is the most important structural step in any repower. Get this right, and you’re setting the stage for a smooth, reliable installation and years of vibration-free performance.

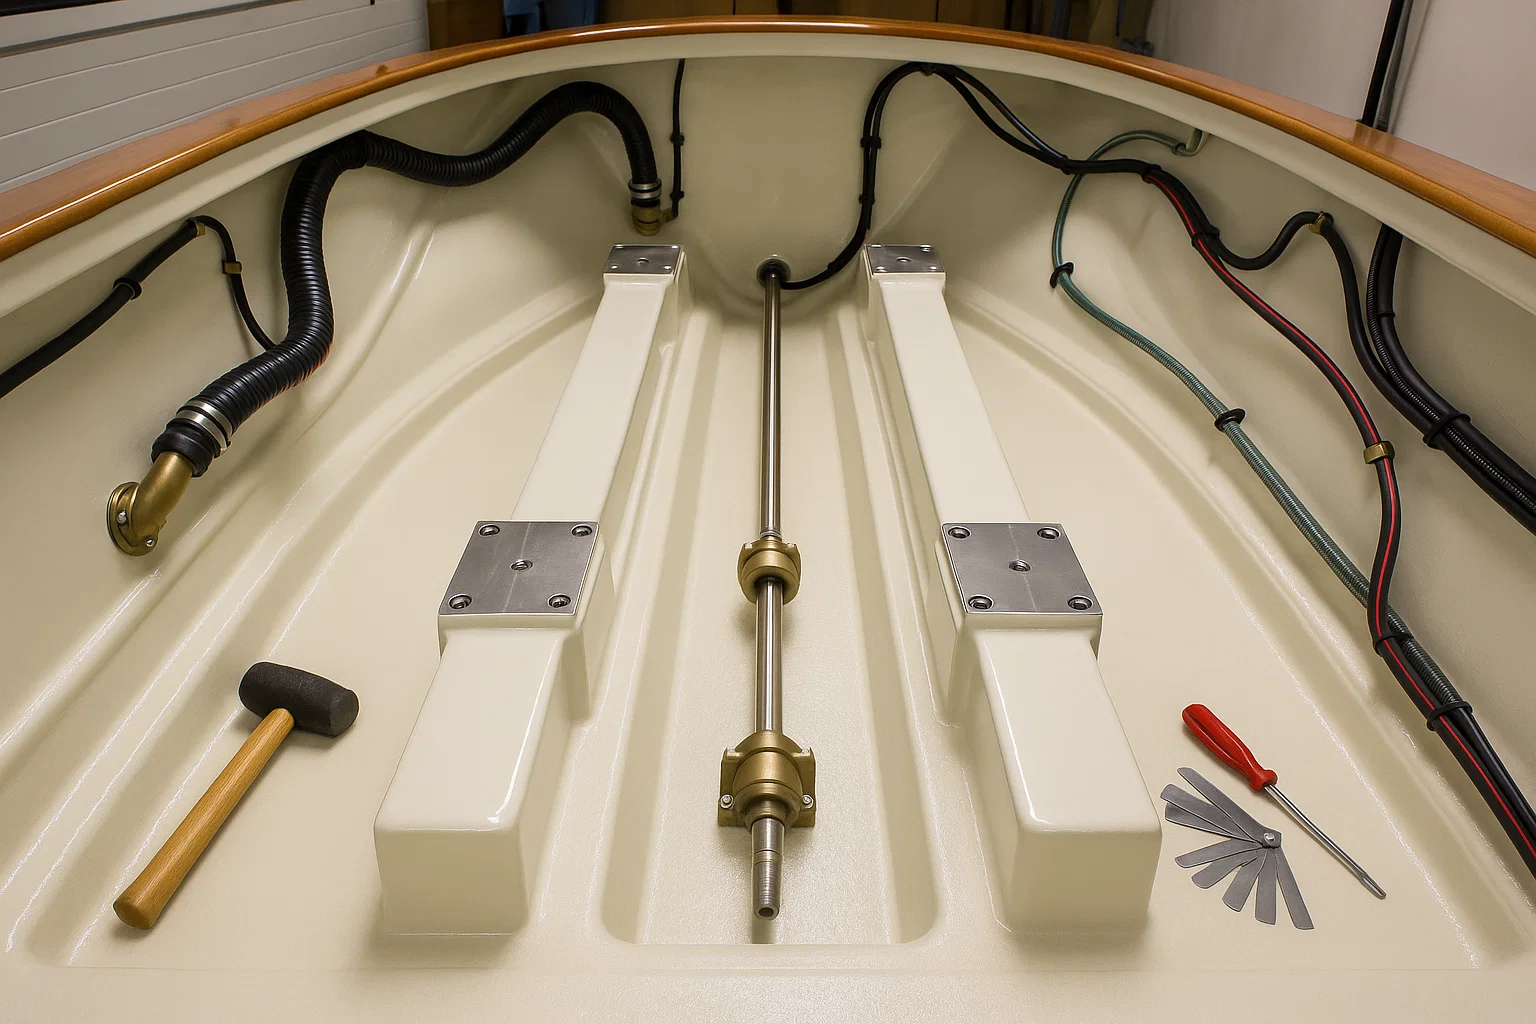
Establishing the Drivetrain Centerline: The Key to Smooth Operation
Proper alignment isn’t just important—it’s the most critical technical aspect of any inboard motor installation.
Getting this wrong is a recipe for disaster. Misalignment will cause excessive vibration, rapid wear on drivetrain components like the cutless bearing and stuffing box, and can even lead to catastrophic transmission damage.
The Core Principle: Shaft Angle and Alignment
The entire process boils down to one essential goal. You must ensure the engine’s output flange and the propeller shaft’s coupling flange are perfectly parallel and concentric once the boat is floating in the water.
This requires the propeller shaft to pass through the hull at a specific, shallow angle. This angle is always a careful compromise between two factors:
- Efficiency: A flatter, more horizontal shaft angle is more efficient.
- Physical Space: The hull shape and engine height dictate what is possible.
All your preliminary work on the engine beds is designed to make this final, precise alignment achievable.
Setting the Foundation: The Stern Tube
Think of the stern tube (or shaft log) as the permanent pathway for your propeller shaft. Its position is permanent once glassed in, so absolute precision here is non-negotiable.
Picture this: you need to create a perfectly straight line from where the engine coupling will be, through the hull, to the propeller.
- Establish the Centerline: Use a modern laser, a tightly stretched steel wire, or the actual prop shaft to mark this exact line.
- Drill the Opening: Start with a pilot hole to verify the path, then use a hole saw to create the final opening for the stern tube.
- Bond it Permanently: Secure the tube at the correct angle and bond it to the hull using multiple layers of fiberglass on both the interior and exterior for maximum strength.
Pre-Assembling the Drivetrain
With the stern tube secured, you can pre-fit the rest of the drivetrain components. This is a crucial dry-run that helps you spot any binding or issues before the heavy engine is in the way.
Slide the new propeller shaft into place through the stern tube and any supporting struts.
Next, install the stuffing box (or a modern dripless shaft seal) onto the inboard end of the stern tube. Finally, attach the shaft coupling to the end of the prop shaft. This is the piece that will ultimately bolt to your engine’s transmission, making it the final link in the chain.
Establishing a true drivetrain centerline is the foundational step that ensures all the power from your new engine is transferred smoothly to the water. This meticulous work prevents destructive vibration and protects your investment from premature wear.
Integrating Supporting Systems for Reliability and Safety
With the core mechanical foundation prepared, you must plan the engine’s “lifeline” systems. Your new motor is only as reliable as the fuel, exhaust, and electrical networks that feed and protect it.
Proper planning here involves smart component selection, careful routing, and strict compliance with marine safety standards like those from the American Boat and Yacht Council (ABYC).
The Fuel System: From Tank to Engine
Think of your fuel system as the engine’s arteries. Any contamination or restriction can be catastrophic. Start by thoroughly inspecting the existing fuel tank for cleanliness and appropriate material.
Next, map out the path for all new lines and components.
- Plan the route for new, USCG-approved A1-15 fuel lines, ensuring they are free from chafing, sharp bends, and hot engine parts.
- Install a new fuel filter/water separator in a location that is easy to access for regular service.
- Verify the fuel tank is properly vented and that every fitting is double-clamped and completely leak-free.
The Exhaust System: Managing Heat and Water
A wet exhaust system removes hot gasses and cooling water simultaneously, but a poorly designed system can flood and destroy your engine. The key is preventing water from ever flowing back toward the cylinders.
Your number one rule: ensure a continuous downward slope from the engine’s exhaust manifold to the hull outlet. If the engine sits low in the boat, near or below the waterline, a high-rise elbow and a vented loop are non-negotiable safety items. Use marine-grade wet exhaust hose and secure every connection with high-quality, double T-bolt clamps.
The Electrical System: Delivering Reliable Power
A modern engine relies on clean, stable power. Start by planning your battery placement—they should be secured in a ventilated box as close to the engine as practical to minimize voltage drop.
Always use correctly sized marine-grade (tinned) cables for the starter, alternator, and ground connections to resist corrosion. Protect the main wiring harness by running it from the engine to the helm inside a chafe-proof sleeve or conduit, and install main battery switches to safely isolate power.
These supporting systems are not afterthoughts; they are integral to a safe, reliable, and long-lasting installation. Getting them right from the start prevents the most common and costly post-launch failures.
Final Preparations for a Seamless Engine Installation
You’re on the home stretch. These final tasks are what separate a frustrating first launch from a smooth, successful one.
This is where meticulous checks prevent last-minute showstoppers and ensure all your hard work pays off.
The Importance of a “Dry Fit”
Think of this as the dress rehearsal for your engine. Before you bolt anything down permanently, carefully lower the engine into the compartment.
This is your last chance to make adjustments easily and confirm your planning was spot-on.
Picture this: your new engine is installed, but you can’t reach the oil filter because it’s jammed against a bulkhead. A dry fit lets you check for critical service access before it’s too late.
- Can you easily reach the dipstick and oil fill cap?
- Is there clearance for routine maintenance on items like filters and belts?
- Do all your new hoses and cables reach their connections without being stretched or sharply kinked?
Sealing, Drip Pans, and Final Touches
Once you’re ready for the final placement, apply a generous bead of high-quality marine sealant, like 3M 5200 or SikaFlex 291, to the bottom of the engine mounts. This creates a waterproof barrier, preventing water intrusion into your stringers.
Consider installing a removable drip pan underneath the engine. A clean bilge isn’t just for looks; it’s your first line of defense in spotting new oil or coolant leaks early.
Finally, do a last sweep of the engine space, removing all tools, rags, and stray hardware.
Post-Launch Checks: The Final Alignment
The job isn’t finished when the boat hits the ramp. A hull can flex and settle once it becomes waterborne, which can throw off your careful workshop alignment.
Let the boat sit in the water for at least 24 hours to allow the hull to fully settle into its natural shape.
Afterward, you must perform the final, most critical check to achieve perfect alignment, which is non-negotiable for a vibration-free drivetrain.
- Disconnect the propeller shaft coupling from the transmission coupling.
- Use a set of feeler gauges to measure the gap between the two faces at the top, bottom, and both sides.
- Carefully adjust the engine on its mounts until the gap is identical all the way around.
These final steps—from the dry fit to the post-launch alignment—are the essential actions that guarantee your new installation is reliable and robust. They transform a complex mechanical project into years of trouble-free time on the water.

Conclusion
Successfully repowering your boat isn’t about the moment the new engine is lowered into place. It’s about the meticulous, foundational work you complete long before that crane ever arrives.
This preparation is what ensures your investment translates into smooth, reliable power for years to come, rather than a series of frustrating and costly problems.
Your Blueprint for Success
As you move forward, keep these core principles at the front of your mind. They are the difference between a good installation and a great one.
- The Foundation is Everything: Your engine is only as secure as the stringers and beds it sits on. Never compromise on structural integrity.
- Alignment is Non-Negotiable: A perfectly aligned drivetrain is the single most critical factor for preventing destructive vibration and premature wear.
- Lifeline Systems Matter: Treat your fuel, exhaust, and electrical systems as integral parts of the engine. Their failure is the engine’s failure.
- Verify Before You Finalize: Use a “dry fit” to check service access and a post-launch check to confirm final alignment. These steps catch mistakes before they become permanent.
Your immediate next step isn’t to order parts. It’s to grab a flashlight, a notepad, and get into the engine bay. Start your assessment, take pictures, and make a plan based on what you’ve learned here.
This diligent prep work is what separates a weekend project from a decade of performance. Do the work now, and your reward will be countless hours of trouble-free time on the water.
Leave a Reply