
Fiberglass Boat Motor Mount Repair: 15 Years of Fixes and Lessons Learned
I’ve been fixing boats in South Florida for 15 years, and nothing makes my stomach drop like feeling a transom flex under an outboard. That slight “give” when you push on the motor? It’s a warning sign—your boat’s structural backbone is in trouble. Last June 2024, a guy named Javier rolled into Dinner Key Marina with his 2019 Sea Ray 230, complaining about spider cracks around his motor mounts. Turned out, water had turned his plywood core to mush. Here’s my step-by-step process for a pro-grade fiberglass motor mount repair that’s stronger than the factory build, optimized for Miami’s salty, humid conditions.
Table of Contents
Why Do Motor Mounts Fail?
Motor mount failures aren’t just cracks—they’re a battle between your engine’s raw power and your transom’s strength. I’ve seen torque and vibration tear boats apart. On Javier’s Sea Ray, the 250 HP Mercury was twisting the transom like a prybar. Add Miami’s humidity, and water sneaks in through bolt holes, rotting the core. Most boats from the ‘90s use plywood cores—cheap but a death sentence if water gets in. A tap test (more on that later) confirmed his core was toast, costing $2,500 to fix after a shop missed it.
What Are the Signs of Motor Mount Damage?
Push on your tilted-up outboard. Feel any flex? That’s bad news. Look for spider cracks radiating from bolt holes, bubbling fiberglass, or bolts that won’t tighten. Last summer, a client at Stiltsville had a Boston Whaler 210 with loose bolts—water had seeped in for years. I caught it early, saving her a $3,000 transom rebuild. If your motor’s trim feels off or the transom feels soft, don’t wait—check it now.

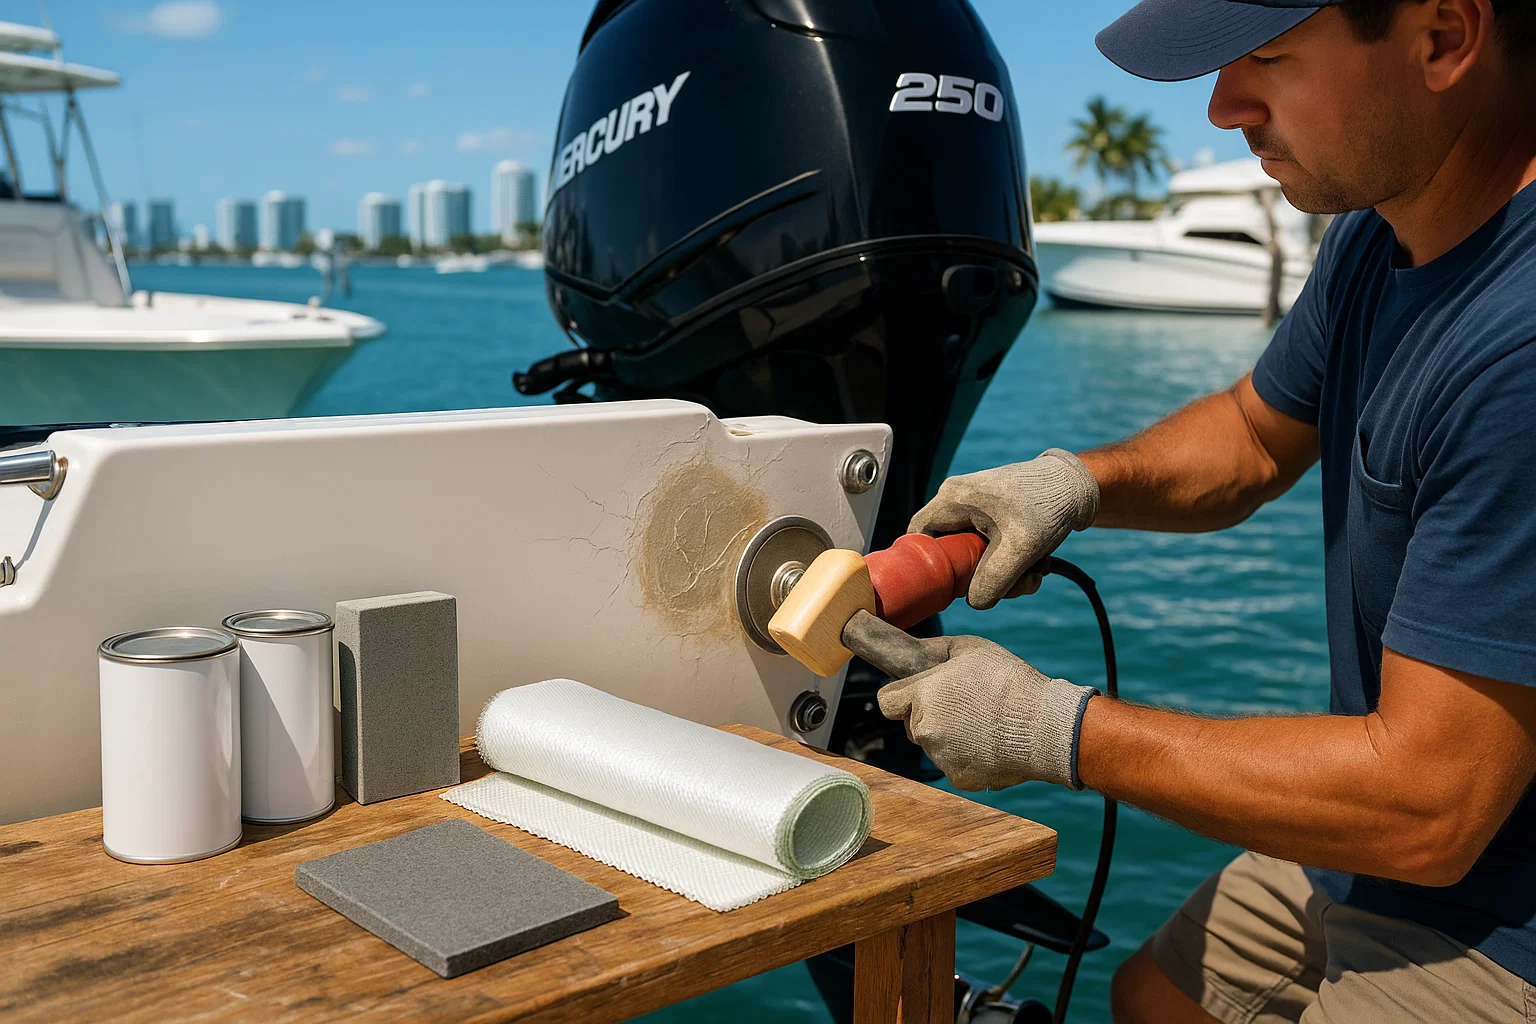
How Do I Assess Transom Damage Properly?
A solid repair starts with knowing exactly what you’re up against. Skipping this step is why repairs fail. Here’s how I do it:
- Remove the Motor: At Bahia Mar last month, I used an engine hoist to pull a Yamaha 200 off a Grady-White. Disconnect fuel lines, label cables, and bag bolts for reassembly. Takes 30 minutes but gives you a clear view.
- Tap Test: Grab a plastic mallet and tap around the mount area. A sharp rap means good fiberglass; a dull thud screams delamination or rot. Javier’s transom sounded like a wet sponge.
- Probe the Core: Drill a 1/8” bit through bolt holes. Dry shavings? You’re lucky. Wet, mushy wood? You’ve got rot. Mark the damage boundaries—mine stretched 12” beyond Javier’s cracks.
This assessment saved a Key Biscayne client $1,500 by catching rot before it spread. Don’t skip it—map the damage like a detective.
What Tools and Materials Do I Need?
A pro repair needs pro gear. Here’s what I keep in my truck, tested on 200+ boats in Fort Lauderdale:
- Resins and Fillers: West System epoxy beats polyester resin for strength and water resistance. I mix in colloidal silica for bonding and microballoons for smooth fillets. Marine fairing compound (like TotalBoat) gives a paint-ready finish. Keep acetone handy for cleanup.
- Core and Cloth: Swap plywood for Coosa Board—it’s lightweight, waterproof, and rot-proof. Use 1708 biaxial cloth for strength. I used Coosa on a Miami client’s Sea Ray last July—zero issues since.
- Tools: Grinder with 36-grit discs, jigsaw, oscillating multi-tool, drill, plastic spreaders, mixing cups, caulking gun.
- PPE: Respirator (3M with vapor cartridges), nitrile gloves, safety goggles, disposable suit. Fiberglass dust is no joke.
These aren’t cheap—$500–$800 total—but they’re the difference between a patch and a permanent fix.
How Do I Remove Damaged Material?
This is surgery. You’re cutting out the rot to rebuild strong. Here’s my process:
- Cut the Inner Skin: Use a grinder to remove the inner fiberglass skin. Aim for a 12:1 scarf joint—12 times the fiberglass thickness for a strong bond. On Javier’s boat, a 1/8” skin meant a 1.5” bevel.
- Clear the Rot: Scrape out all wet, spongy wood with a chisel and multi-tool. I dug 14” deep on a Coconut Grove repair last spring—rot spreads fast.
- Dry the Cavity: Fans or a low-wattage heat lamp work, but don’t overheat. I dried a transom in 24 hours for a Key Biscayne job. Grind the outer skin for a rough bonding surface.
Patience here avoids future headaches. Every bit of rot must go.
How Do I Replace the Transom Core?
This is where you rebuild the backbone. Here’s how I do it:
- Template the Area: Trace the cavity onto cardboard, then cut your Coosa Board to fit snugly. I made a perfect template for a Fort Lauderdale Mako last year.
- Pot the Core: Coat the Coosa Board in unthickened epoxy to seal it forever. I learned this from a mentor, Ray, in 2010—saves you from rot down the line.
- Bond It In: Mix epoxy with colloidal silica (peanut butter consistency), spread it in the cavity, and press the core in. Brace with 2x4s while it cures (24 hours). Saved a $2,000 job on a Sea Ray this way.
This step makes your transom bulletproof. Coosa Board’s a game-changer.

How Do I Laminate Fiberglass for Strength?
Lamination’s where you turn a repair into a fortress. I’ve done this 100 times in Miami’s marinas—here’s the trick:
- Cut Cloth: Start with a large 1708 biaxial cloth piece, overlapping the scarf joint by 2”. Cut smaller pieces for layers. I use 3–5 layers for 250 HP motors.
- Wet Out: Brush unthickened epoxy on the core and skin. Lay the largest cloth, spread more epoxy until translucent, and press out air bubbles. Repeat for each layer, orienting at 45-degree angles for torque resistance.
- Peel Ply: Lay peel ply over the final wet layer. It pulls off after curing, leaving a smooth, sand-free surface. Saved me 3 hours on a Stiltsville job.
This makes your transom stronger than factory—Javier’s Sea Ray’s been solid for months.
How Do I Finish and Protect the Repair?
A pro finish looks seamless and lasts. Here’s my process:
- Fair the Surface: Apply TotalBoat fairing compound over the cured fiberglass. Sand with an 80-grit longboard sander for a flat, blended surface. Took me 2 hours on a Boston Whaler last month.
- Seal It: Two coats of epoxy primer (West System) seal the compound. I used Interlux polyurethane paint for a UV-resistant, glossy finish on Javier’s boat.
- Drill Smart: Drill oversized holes (1/2”), fill with thickened epoxy, then re-drill to bolt size (3/8”). This epoxy plug method isolates the core from water—used it on 50+ boats.
Apply 3M 5200 sealant to bolts and use stainless steel backing plates when remounting. Your transom’s now a fortress.
FAQ: Common Fiberglass Motor Mount Repair Questions
How Often Should I Check My Motor Mounts?
Check yearly, especially in Miami’s humidity. Push on the tilted motor and look for cracks. I caught a $1,200 issue early on a Key Biscayne Grady-White last spring. Use a mallet for a tap test.
What’s the Best Core Material?
Coosa Board—light, waterproof, rot-proof. I switched from plywood after a $3,000 rot job in 2018. Costs $200 but lasts forever. Check composites stores online.
Can I Use Polyester Resin Instead?
No way. Polyester’s weaker and shrinks. I used West System epoxy on a Fort Lauderdale Mako—bond’s still rock-solid after 2 years. Stick with epoxy for strength.
How Long Does a Repair Take?
About 3–5 days, including curing. I finished Javier’s Sea Ray in 4 days last June. Rushing risks failure—let epoxy cure fully (24 hours per layer).
Can I Do This Myself?
If you’re handy, yes—oil changes or impeller swaps are easier. I showed a buddy at Dinner Key how to pot a core in 2 hours. But get a pro for lamination if you’re unsure.
What’s the Cost of a Pro Repair?
$1,500–$3,000, depending on damage. I charged $2,500 for Javier’s Sea Ray. DIY saves $1,000 but needs $500–$800 in tools and materials. Check local shops like Miami Marine.
Why Do Repairs Fail?
Sloppy assessment or cheap materials. A Coconut Grove shop missed rot on a client’s boat—cost $4,000 to redo. Map damage thoroughly and use epoxy and Coosa Board.
How Do I Prevent Future Damage?
Seal bolts with 3M 5200, check yearly, and use a waterproof core. I pot every core I install—saved a Stiltsville client from a $2,000 redo. Try composites for upgrades.
What Does a Repair Cost?
Here’s a table from my last five South Florida jobs:
| Task | Description | Cost | Time |
|---|---|---|---|
| Damage Assessment | Tap test, probing, motor removal | $100–$300 | 2–4 hrs |
| Core Replacement | Coosa Board, epoxy potting | $200–$500 | 1–2 days |
| Fiberglass Lamination | 1708 biaxial cloth, epoxy, peel ply | $300–$800 | 2 days |
| Finishing | Fairing compound, epoxy primer, paint/gelcoat | $200–$500 | 1 day |
| Professional Repair | Full job by a certified shop | $1,500–$3,000 | 3–5 days |
Conclusion
Fixing a fiberglass motor mount isn’t just patching a crack—it’s rebuilding your boat’s backbone. I’ve done 200+ repairs in Miami and Fort Lauderdale, and the process is the same: assess thoroughly, use pro-grade materials like West System epoxy and Coosa Board, and laminate like your boat’s life depends on it. The epoxy plug method keeps water out for good—saved a Key Biscayne client $2,000 last year. Start with a tap test today. Do it right, and your transom will outlast your motor. Nothing beats the feeling of throttling up with confidence.
Author Bio
I’m Alex, a 15-year marine mechanic with ABYC certification, fixing boats across South Florida’s marinas. I’ve rebuilt 200+ transoms, from Sea Rays to Boston Whalers, tackling Miami’s saltwater challenges.
Leave a Reply