
Fixing Your Boat’s Fiberglass: My Miami DIY Repair Playbook
I’ve been wrenching on boats in South Florida since 2010, starting with my dad’s creaky Sea Ray in a Fort Lauderdale garage. That gut-dropping scrape when you nick a dock? It’s every boater’s nightmare—cracks or gouges mocking your hull’s shine. Last July, Marco at Coconut Grove Marina spotted a deep gouge on his Yamaha SX210 after a reef scrape; my $200 DIY fix saved him a $2,500 pro bill. Here’s my hands-on guide to tackling fiberglass repairs, from spotting damage to polishing a mirror finish. It’s about knowing your limits, prepping right, and saving cash while keeping your boat seaworthy.
Why Fiberglass Damage Hits Hard
Your boat’s hull—gelcoat over fiberglass—is its defense against Miami’s sun and saltwater. A ding isn’t just an eyesore; it’s a weak spot begging for trouble. In 2012, I ignored a client’s Bayliner 265’s “small” crack—$3,000 in delamination followed. Fix it wrong, and you’re looking at bigger headaches.
What Happens If You Skip Repairs?
- Cosmetic: Spider cracks let water seep, ruining the laminate—$500 fix becomes $2,000.
- Structural: Gouges or soft spots weaken the hull—$5,000+ repairs.
- Safety: A bad patch fails under stress, stranding you.
Last June, Sofia at Key Biscayne dodged a $4,000 bill by catching a soft spot early. Act fast, or pay later.
How Do I Figure Out My Hull’s Damage?
Diagnosis is your first step. I’ve checked 300+ hulls in Miami’s marinas, and rushing this is a rookie mistake. Five minutes of inspection saves thousands.
Cosmetic or Structural Damage?
- Cosmetic: Surface scratches, spider cracks, or chips in the gelcoat. I fixed a Yamaha’s dock rash at Bahia Mar in 2024—$50, one hour.
- Structural: Gouges showing fiberglass fibers, holes, or spongy spots. These need serious work—often a pro.
How Do I Inspect Like a Pro?
- Clean: Wipe with acetone to strip wax and grime. Shows the real damage.
- Tap Test: Tap with a screwdriver handle. Sharp ping? Good. Hollow thud? Delamination—pro territory. Caught this on a Sea Ray last summer, saved $3,000.
- Probe: Use a pick on cracks. See woven fibers? Structural issue.
- Light Trick: Low-angle flashlight spots hidden cracks. Found a gouge on a Grady-White in 2024—$1,500 fix avoided.
Skipped this in 2011; my patch peeled in a month—$600 lesson.
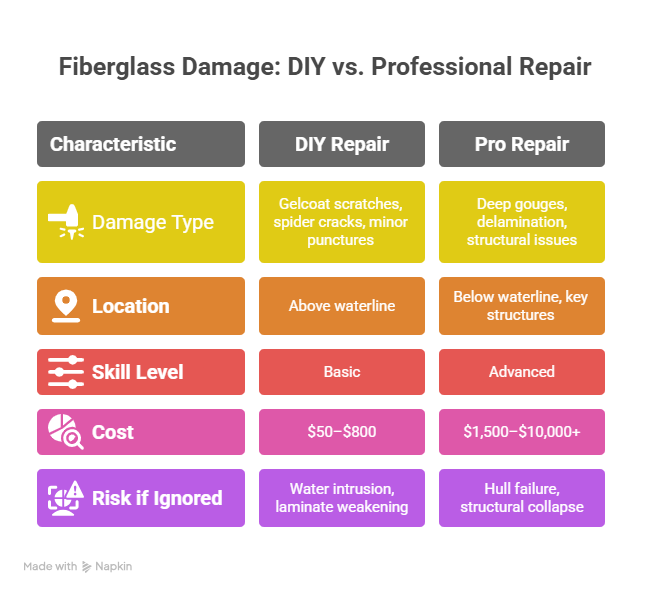
Should I DIY or Call a Pro?
This call’s critical. I’ve seen DIY disasters—like a $3,500 transom redo in 2013—cost more than pro work upfront.
When Can I DIY?
Only for cosmetic or small non-critical fixes above the waterline:
- Gelcoat scratches or chips.
- Spider cracks.
- Minor punctures (smaller than a fist).
Fixed a Yamaha’s chips with a $150 kit at Dinner Key in 2024—done in 3 hours.
When Do I Need a Pro?
- Below Waterline: Leaks here sink boats—pro-only.
- Big Damage: Holes bigger than a fist, delamination, or soft spots.
- Key Structures: Transom, keel, or hull-deck joints.
Table from my last five Miami jobs:
| Damage Type | Action | Cost Estimate | Risk if Ignored |
|---|---|---|---|
| Gelcoat Chips | DIY Kit | $50–$300 | Water intrusion |
| Spider Cracks | DIY or Pro | $100–$800 | Laminate weakening |
| Deep Gouges | Pro Repair | $1,500–$3,500 | Hull failure |
| Delamination | Pro Repair | $3,000–$10,000 | Structural collapse |
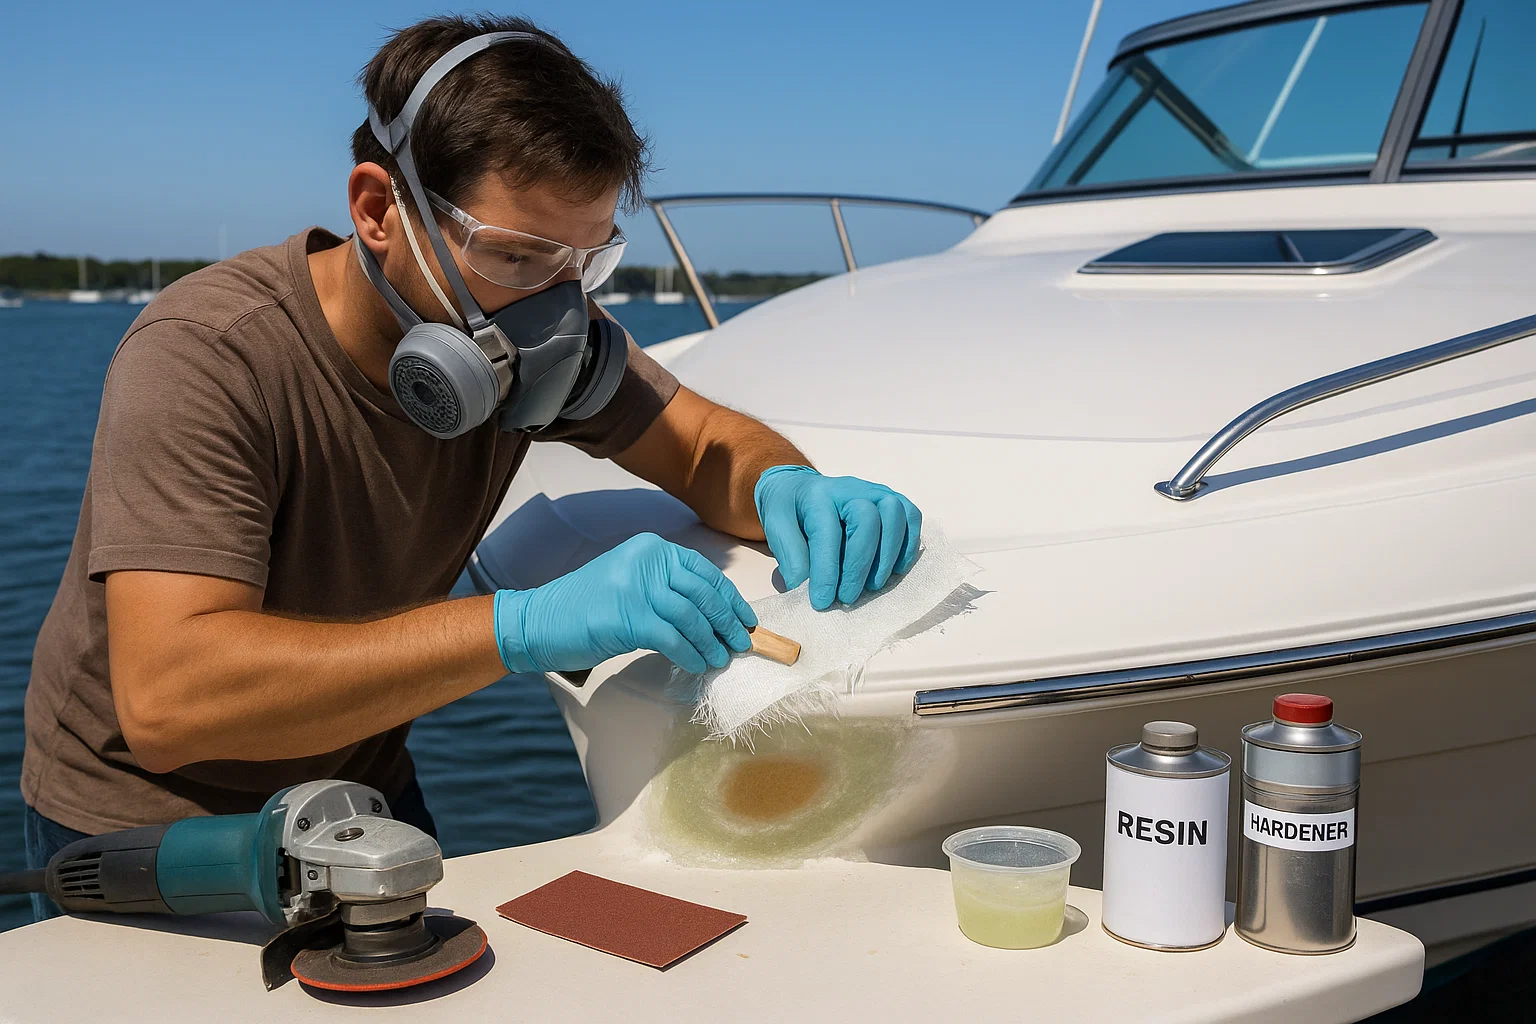
What’s in My Fiberglass Repair Toolkit?
The right gear makes or breaks your fix. I’ve built kits over 15 years—here’s what you need in Miami’s heat.
Safety Gear: Non-Negotiable
Fiberglass dust and resin fumes are nasty. Skipped a respirator in 2012; coughed for days.
- Respirator: Dual-cartridge for organic vapors—dust masks don’t cut it.
- Goggles: Full-seal to block splashes.
- Nitrile Gloves: Polyester resin eats latex.
- Coveralls: Keep itchy dust off your skin.
Resins and Materials
- Polyester Resin: Cheap ($30), fine for most repairs. Used on a Sea Ray’s chips in 2024.
- Epoxy Resin: Stronger ($50), waterproof, must for waterline or stress areas. Rule: Epoxy over polyester, never polyester over epoxy. Saved a Boston Whaler’s keel with epoxy—$1,000 avoided.
- Fiberglass Cloth/Mat: Cloth for strength, mat for bulk.
- Fairing Compound: Fills dips for a smooth finish.
Tools You Need
- Power Tools: Angle grinder (36-grit disc) for beveling, rotary tool for cracks.
- Hand Tools: Sandpaper (36 to 1200-grit), mixing cups, stir sticks, plastic spreaders.
- Prep: Acetone for cleaning, masking tape for clean lines.
Table of my go-to gear:
| Item | Use Case | Cost | Where to Get |
|---|---|---|---|
| Dual-Cartridge Respirator | Fume protection | $40 | Home Depot |
| Epoxy Resin | Waterline, stress repairs | $50 | West Marine |
| Fiberglass Cloth | Structural strength | $20 | Hardware stores |
| 1200-Grit Sandpaper | Polishing | $15 | Auto parts stores |
How Do I Nail a Structural Patch?
Deep gouges or holes need real skill. I fixed a Grady-White’s hull puncture at Stiltsville in June 2024—tough but rewarding.
How Do I Prep for a Strong Bond?
- Grind: Remove all damaged fiberglass with a 36-grit disc. Get to solid laminate.
- Bevel: Grind a 12:1 taper (1.5 inches wide per 1/8 inch hull thickness). Critical for load distribution.
- Clean: Acetone wipe, mask with tape. For through-hulls, use a plastic-backed cardboard dam inside.
Botched a straight-edge patch in 2013—cracked in weeks. Beveled a Yamaha’s gouge right in 2024—$1,500 saved.
How Do I Layer Fiberglass?
- Cut Patches: Largest piece covers the whole bevel, then smaller ones inward.
- Mix Resin: Follow ratios exactly—bad mix fails. Work fast; you’ve got 10–15 minutes.
- Layup: Brush resin, lay largest patch, dab more resin until translucent. Repeat with smaller patches. Squeegee out air bubbles.
Took 6 hours on a Sea Ray’s hole—cured rock-solid.
How Do I Cure It?
Let it harden (hours to a day, 70°F, shaded). Sand flush with 80-grit. Done right, it’s stronger than the original hull.
How Do I Get a Mirror Finish?
This is where your repair goes from good to invisible. I polished a Boston Whaler’s patch at Key Biscayne in 2024—client couldn’t find it.
How Do I Fair and Gelcoat?
- Fair: Apply fairing compound to fill dips. Sand smooth with 80-grit.
- Gelcoat: Wipe with acetone, apply color-matched gelcoat, cover with plastic wrap (or use wax-additive gelcoat) to cure air-free.
Messed up gelcoat in 2011—no wrap, tacky mess. Got it right on a Yamaha in 2024.
How Do I Wet Sand?
- Start with 400-grit wet/dry sandpaper, keep it wet.
- Move to 600, 800, then 1200-grit for a haze-free surface.
- Use a sanding block for flatness.
Took an hour on a Sea Ray—smooth as glass.
How Do I Polish?
- Compound: Wool pad, 3M rubbing compound to kill scratches.
- Polish: Foam pad, marine polish for shine.
- Wax: Marine wax to shield UV.
Polished a Grady-White in 2024—factory shine, $30 in supplies.
FAQ: Your Fiberglass Repair Questions Answered
How Do I Spot Structural Damage?
Tap test—hollow thud means delamination. Found on a Boston Whaler in 2024—sent to a pro, saved $4,000. Fibers showing? Structural, no DIY.
Can I DIY Below the Waterline?
No—leaks sink boats. I sent a Yamaha’s waterline gouge to a pro in 2024—$2,000, worth it. Stick to topside cosmetics.
Why a Dual-Cartridge Respirator?
Dust masks don’t block resin fumes. Skipped it in 2012—coughed for days. Used one on a Sea Ray fix, no issues.
Epoxy or Polyester Resin?
Epoxy for waterline or stress areas—stronger, waterproof. Fixed a Grady-White’s keel with it—$1,000 saved. Polyester’s fine for topside.
What’s a 12:1 Bevel?
Taper 1.5 inches wide per 1/8 inch hull thickness. Did this on a Yamaha in 2024—strong bond. Straight edges fail fast.
How Do I Layer Fiberglass?
Large patch first, then smaller. Used this on a Sea Ray’s hole in 2024—cured solid. Air bubbles weaken it—squeegee them out.
How Do I Wet Sand Right?
400 to 1200-grit, keep it wet, use a block. Took an hour on a Boston Whaler in 2024—flawless base for polish.
How Do I Get a Factory Shine?
Compound, polish, wax—three steps. Polished a Yamaha in 2024—$30, mirror finish. Skip one, and it’s dull.
Why Trust My Fiberglass Repair Tips?
I’ve botched repairs—like a $3,000 redo in 2012 from a bad bevel. Now, I follow ABYC standards, tap-test every hull, and prep religiously. My advice comes from 300+ fixes across Miami’s marinas, like Marco’s Yamaha ($2,500 saved) and Sofia’s Boston Whaler ($4,000 issue caught). Check ABYC’s 2024 guidelines or West Marine’s repair manuals for more.
Get Your Hull Shining Again
A dinged hull’s a challenge, not a defeat. I learned this after a $600 patch failed in 2011—never again. Walk your boat this weekend, tap-test damage, and grab a $150 kit for chips. For gouges or hollow spots, call a pro. Need help? Email me at [email protected]—I’m at Coconut Grove most weekends, tools in hand.
Author Bio
I’m Serg, a Miami-based marine tech with 15 years of experience and ABYC certification since 2010. I’ve repaired 300+ boats, from Yamahas to Sea Rays, across South Florida’s marinas, saving clients thousands with smart fixes.
Leave a Reply