
Key Takeaways
Don’t let an overheating engine ruin your day on the water. A methodical approach and a little preventative maintenance can help you diagnose and fix most cooling system issues yourself. Here are the essential takeaways to keep your engine running cool and reliable.
- Check your exhaust first when an engine overheats. No water flow points to a blockage or pump failure, while normal flow with high temps suggests an internal problem like a stuck thermostat.
- Start with the simple fixes by first cleaning the sea strainer, the most common cause of overheating. If that fails, inspect the raw water pump’s impeller for visible damage or brittle rubber.
- Replace the raw water impeller annually as a non-negotiable maintenance task. A failed impeller doesn’t just stop flow—it can shred, sending damaging rubber fragments throughout your cooling system.
- Address overheating under load by inspecting your exhaust elbow. This often-overlooked part can become clogged with rust and scale, creating a hidden bottleneck that restricts water outflow at high RPMs.
- Diagnose leaks accurately by checking for air versus water. A leak on the suction side before the pump sucks in air and kills the prime, while a pressure-side leak will visibly drip water or coolant.
- Treat the thermostat as a wear item, not a forever part. Proactively replacing it every 2-3 years prevents sudden overheating (if stuck closed) or poor engine performance (if stuck open).
- Prioritize proper winterization to prevent catastrophic freeze damage. Failing to drain or flush the system with antifreeze can lead to a cracked engine block or manifold, one of the most expensive repairs.
Mastering these concepts will give you the confidence to tackle any cooling system challenge, so dive into the full guide for step-by-step instructions.
Introduction
There’s no sound that stops a boater’s heart faster than the piercing shriek of an engine overheating alarm.
That single sound can turn a perfect day on the water into a stressful scramble, leaving you wondering if you’re facing a simple fix or a trip-ending failure that requires an expensive tow.
But what if you had a clear, methodical plan? One that transforms that moment of panic into a confident, step-by-step diagnosis. This guide is built to do exactly that, moving you from problem to solution efficiently and safely.
Instead of guessing, you will learn how to:
- Instantly identify your engine’s specific cooling system.
- Follow a systematic troubleshooting process that starts with the easiest fixes.
- Pinpoint common failures like bad impellers, stuck thermostats, and hidden blockages.
- Adopt a proactive maintenance routine for true peace of mind on the water.
Before you can fix a problem, you need to understand the system. Let’s start by looking at the lifeline of your marine engine and how it keeps its cool.
Understanding the Heart of Your Marine Cooling System
Your marine engine’s cooling system is its absolute lifeline. Knowing how it works is the first step to fixing any problem you encounter on the water.
Unlike a car that uses a radiator and air, your boat’s engine uses the very water it’s floating in to stay cool. This simple fact changes everything about how you diagnose an issue, so let’s break down the two primary systems.
Raw Water Cooling (Open-Loop Systems)
This is the simplest setup, common on many smaller boats and outboards. It’s a direct-cooling method that is highly effective but exposes internal engine passages to raw water.
Picture your engine drawing in outside water through an intake, circulating it directly through the hot engine block to absorb heat, and then expelling it overboard with the exhaust.
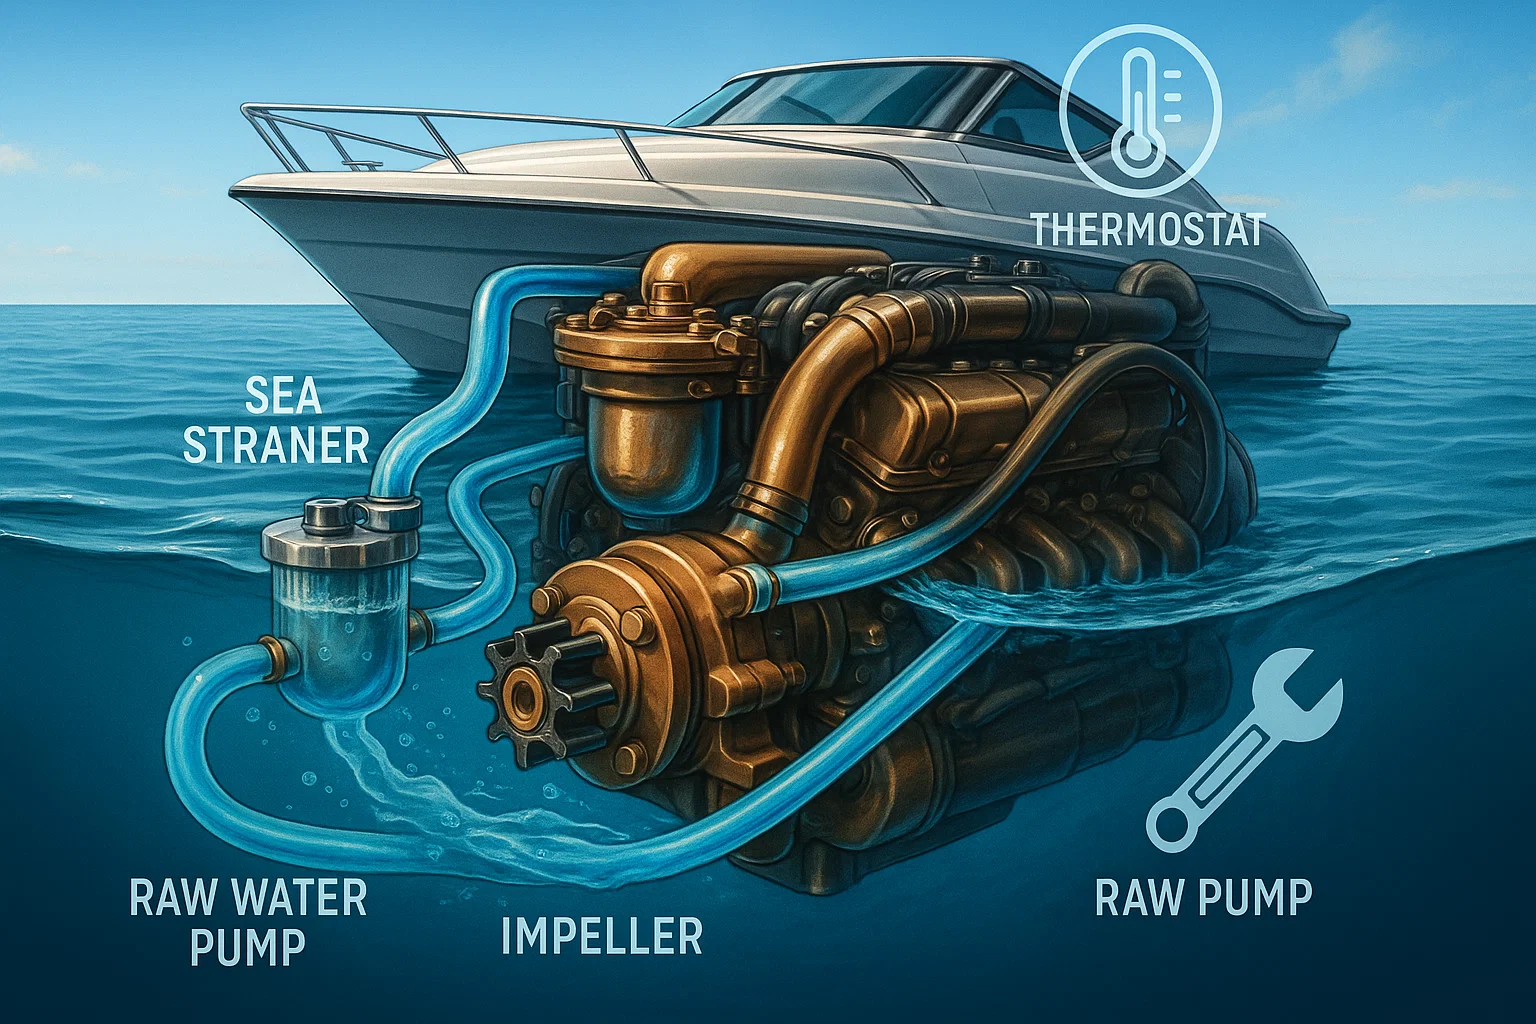
Its key parts are your first line of defense in troubleshooting:
- Seacock/Intake: The valve that lets water into the system.
- Sea Strainer: A filter that catches debris like seaweed and plastic before it enters the engine.
- Raw Water Pump & Impeller: A rubber, star-shaped wheel that pulls water into the system. The impeller is a critical wear-and-tear item.
- Thermostat: The gatekeeper that regulates engine temperature by controlling water flow.
Freshwater Cooling (Closed-Loop Systems)
Found on most larger inboard engines, this more complex system is far better for protecting the engine from saltwater corrosion.
It uses two separate circuits. A sealed “closed loop” circulates an antifreeze mixture through the engine, while a second raw water loop cools that antifreeze using a heat exchanger. Think of it as a radiator within a radiator.
This system includes all the raw water components, plus:
- Heat Exchanger: Where heat is transferred from the engine’s coolant to the raw sea water.
- Coolant Reservoir/Expansion Tank: Holds the engine coolant, just like in your car.
- Circulating Pump: Moves the antifreeze mixture through the engine’s closed loop.
Identifying which of these two systems your boat has is the essential starting point for any diagnosis. When your temperature gauge starts to climb, knowing whether you’re dealing with a simple raw water blockage or a more complex heat exchanger issue will guide your every move.
The Systematic Troubleshooting Process: Your First Response to Overheating
When your temperature gauge starts to climb, don’t panic. A methodical approach is your best friend on the water and will help you pinpoint the problem quickly and safely.
Always start with the simplest and most common culprits first.
Your Immediate Onboard Check
Your first actions can reveal almost everything you need to know.
Picture this: the alarm sounds. Your first glance should be at the temperature gauge to see how quickly it’s rising. Your second glance should be overboard at your exhaust outlet.
You are looking for a steady stream of water being expelled.
- Weak flow or no water? This immediately points to a blockage or a failed raw water pump.
- Normal water flow but still hot? This suggests an internal issue, like a stuck thermostat or a clogged heat exchanger.
Finally, do the one thing everyone forgets: double-check that your raw water intake seacock is fully open.
Tackle the Most Common Culprit: The Sea Strainer
This is the most common cause of overheating and, luckily, the easiest to fix. Before you assume the worst, always check this first.
- Safety First: Close the raw water seacock before you unscrew the strainer lid.
- Clean It Out: Open the housing, pull out the basket, and clear away any seaweed, grass, or plastic debris.
- Reassemble Carefully: Make sure the rubber O-ring is clean and seated perfectly. A poor seal can suck air into the system, preventing the pump from working.
Investigate the Heart of the Flow: The Impeller
If the strainer is clean but water flow is still weak or gone, the raw water pump’s impeller is the next logical suspect.
This flexible rubber wheel is a vital component that needs annual inspection. When it fails, it doesn’t just stop pulling water—it can shred, sending rubber fragments into the cooling passages and causing bigger blockages.
Signs of a bad impeller include:
- Visible cracks or missing fins (vanes)
- Rubber that feels brittle and inflexible
Accessing the impeller usually just means removing a cover plate on the pump. If it shows any signs of wear, replace it immediately.
By methodically checking these three areas—intake flow, strainer, and impeller—you can diagnose and solve the vast majority of overheating issues. This simple, ordered process turns a panicked moment into a manageable problem.
Diving Deeper: Fixing Common Component Failures
If the basics like the strainer and impeller check out, it’s time to investigate the components that regulate temperature and manage heat.
These parts often cause persistent issues that require a more hands-on fix than a simple cleaning.
The Thermostat: Stuck Open or Closed?
Your engine’s thermostat is the gatekeeper for coolant flow, and when it fails, it causes distinct problems.
A bad thermostat is a frequent culprit when the engine temperature is wrong, but water flow from the exhaust looks fine. Experts recommend replacing your thermostat every 2-3 years as proactive maintenance, even if it hasn’t failed yet.
It can fail in two primary ways:
- Stuck Closed: This is the most common cause of rapid overheating. The thermostat blocks coolant from circulating, causing temperatures to spike quickly.
- Stuck Open: This prevents the engine from reaching its proper operating temperature. The engine will run too cool, leading to poor fuel economy and increased engine wear over time.
The Exhaust Elbow: The Hidden Bottleneck
Picture this: your boat runs fine at the dock but starts overheating as soon as you push the throttle. The culprit could be your exhaust elbow.
This is one of the most overlooked causes of overheating, especially in saltwater-cooled engines. Over time, rust and salt deposits build up inside the elbow’s small water passages, creating a serious blockage.
This bottleneck restricts the outflow of water, creating back-pressure that can starve the engine of coolant.
Look for these clear symptoms of a clogged elbow:
- Engine overheats primarily under load or at high RPMs.
- Excessive steam coming from the exhaust outlet.
- Bulging rubber end caps on the heat exchanger from built-up pressure.
Fixing a clogged elbow requires removing it for inspection. While some can be cleaned with a wire, heavy corrosion often means a full replacement is the only reliable solution.
Component failures like a stuck thermostat or a clogged elbow often hide in plain sight. Learning to spot their unique symptoms is key to solving stubborn overheating issues and protecting your engine from serious damage.
Addressing System-Wide Issues: Leaks, Blockages, and Contamination
When a single part isn’t the problem, you need to look at the entire system. System-wide issues like hidden leaks, internal blockages, and fluid contamination can cause persistent overheating that a simple part swap won’t fix.
Tracking these down requires a bit of detective work.
Hunt Down Leaks and Collapsed Hoses
A tiny leak can have a massive impact, especially if it’s letting air in instead of letting water out.
A leak’s location determines its symptom. It’s crucial to know the difference.
- Suction Side Leak (Intake to Pump): This is the silent killer. A leak here sucks air into the system, causing the pump to lose prime and stop moving water. The most common culprit is an old, soft hose that collapses under the pump’s suction.
- Pressure Side Leak (Pump to Engine): This is the one you can see. It will visibly drip or spray water/coolant. Check all hose clamps, fittings, and the water pump seal for tell-tale signs.
To find the problem, look for salt crystal trails or faint antifreeze stains. Squeeze the hoses; they should feel firm, not soft or spongy.
Inspect for Internal Blockages and Contamination
If your engine overheats under load but the raw water flow from the exhaust looks fine, you likely have an internal blockage or contamination.
Over time, the heat exchanger can get clogged with mineral deposits and scale, acting like an insulator and preventing it from cooling properly. This requires removing the end caps to clean the core.
Contamination, however, points to a more serious failure.
- Saltwater in the Coolant: If your coolant looks milky, you have a major problem. This indicates a ruptured heat exchanger core is allowing high-pressure saltwater into your closed-loop coolant system.
- Oil in the Coolant: A milky, brown, or frothy appearance in your coolant often signals a failed engine oil cooler or a leaking head gasket.
Catching these system-wide problems early is the difference between a simple repair and a catastrophic engine failure. Regularly inspect your hoses and check your coolant’s color and consistency to ensure your engine’s circulatory system is healthy.
Proactive Maintenance: Your Best Defense Against Cooling System Failure
The best way to fix a cooling system problem is to prevent it from ever happening. An hour of maintenance on the dock is always better than a weekend of failed plans and costly repairs on the water.
A regular schedule turns potential disasters into simple, predictable tasks.
Your Essential Annual Checklist
Think of this as your non-negotiable pre-season routine. Performing these checks at least once a year will prevent over 80% of common overheating issues.
- Replace the Raw Water Impeller: This is the single most important maintenance item. Treat this as an annual task, regardless of how it looks. A failed impeller can send rubber fragments through the entire system.
- Inspect Hoses and Clamps: Squeeze all cooling hoses. They should feel firm, not spongy or soft. Replace any that show cracks, bulges, or signs of collapsing.
- Clean the Sea Strainer: While you should check this before every trip, give it a deep clean at the start of the season.
- Check Sacrificial Anodes: Inspect and replace the zinc anodes in your heat exchanger and engine block. They are designed to corrode so your expensive engine components don’t.
The Critical Coolant Flush
For any engine with a closed-loop (freshwater) system, flushing the coolant is not optional.
Old coolant loses its anti-corrosive properties, effectively turning it into a recipe for internal rust and clogged passages. Experts recommend replacing your thermostat every 2-3 years, and a coolant flush is the perfect time to do it.
This process ensures your engine is protected from the inside out.
Winterization: Your Engine’s Life Insurance
Properly winterizing the cooling system prevents catastrophic freeze damage that can crack an engine block or manifold.
For raw water systems, this means fully draining the system or flushing it with non-toxic antifreeze. For closed-loop systems, you must verify the coolant’s freeze protection and drain the raw water side completely.
Skipping this step is one of the most expensive mistakes a boat owner can make.
Consistent maintenance isn’t just a chore; it’s your ticket to reliable performance and peace of mind on every voyage. It transforms you from a passenger into a confident captain of a well-kept vessel.
Conclusion
Mastering your engine’s cooling system transforms you from a worried passenger into a confident captain. You now have the framework to turn a stressful overheating alarm into a manageable, step-by-step diagnostic process.
This knowledge isn’t just for emergencies; it’s for prevention. The goal is to spend your time enjoying the water, not being stranded by a problem you could have easily avoided.
Here are the key actions that will keep your engine running cool:
- Troubleshoot in Order: Always check exhaust water flow first, then the sea strainer, then the impeller. This simple sequence will diagnose and solve the vast majority of overheating issues.
- Prioritize the Impeller: Treat the raw water impeller as a non-negotiable annual replacement. Its failure can send rubber fragments into your system, causing far more complex blockages.
- Think Beyond the Basics for Stubborn Issues: If your engine only overheats under load, investigate the exhaust elbow for hidden blockages. If your coolant looks milky, check for a failed heat exchanger immediately.
- Know Your Hoses: A soft, collapsing hose on the intake side sucks in air and kills water flow, while a leak on the pressure side visibly drips. Squeeze your hoses regularly.
Your next voyage starts on the dock. This weekend, take 15 minutes to inspect your sea strainer and feel your cooling hoses for firmness. Then, pull out your calendar and schedule your annual impeller replacement and coolant flush.
A reliable engine isn’t about luck; it’s the direct result of knowledge and preparation. By making these checks part of your routine, you’re not just maintaining an engine—you’re investing in uninterrupted days and complete peace of mind on the water.
Leave a Reply