
Key Takeaways
Tackling your boat’s electrical system can feel daunting, but most issues stem from a few common causes. This guide provides a clear roadmap for diagnosing and fixing problems with confidence. By mastering a few core principles and techniques, you can ensure your vessel’s electrical system is safe, reliable, and ready for your next trip.
- Prioritize marine-grade materials to combat the harsh environment. Always use tinned copper wire and heat-shrink sealed connectors to prevent corrosion, which is the primary cause of electrical failure on the water.
- Protect the wire, not the device with correctly sized fuses and breakers. A tripped breaker is a symptom, not the problem—never replace a fuse with a larger one, as this creates a serious fire hazard.
- Diagnose charging issues with a simple voltage test at the battery terminals while the engine is running. A healthy alternator system should produce a reading between 13.2V and 14.4V.
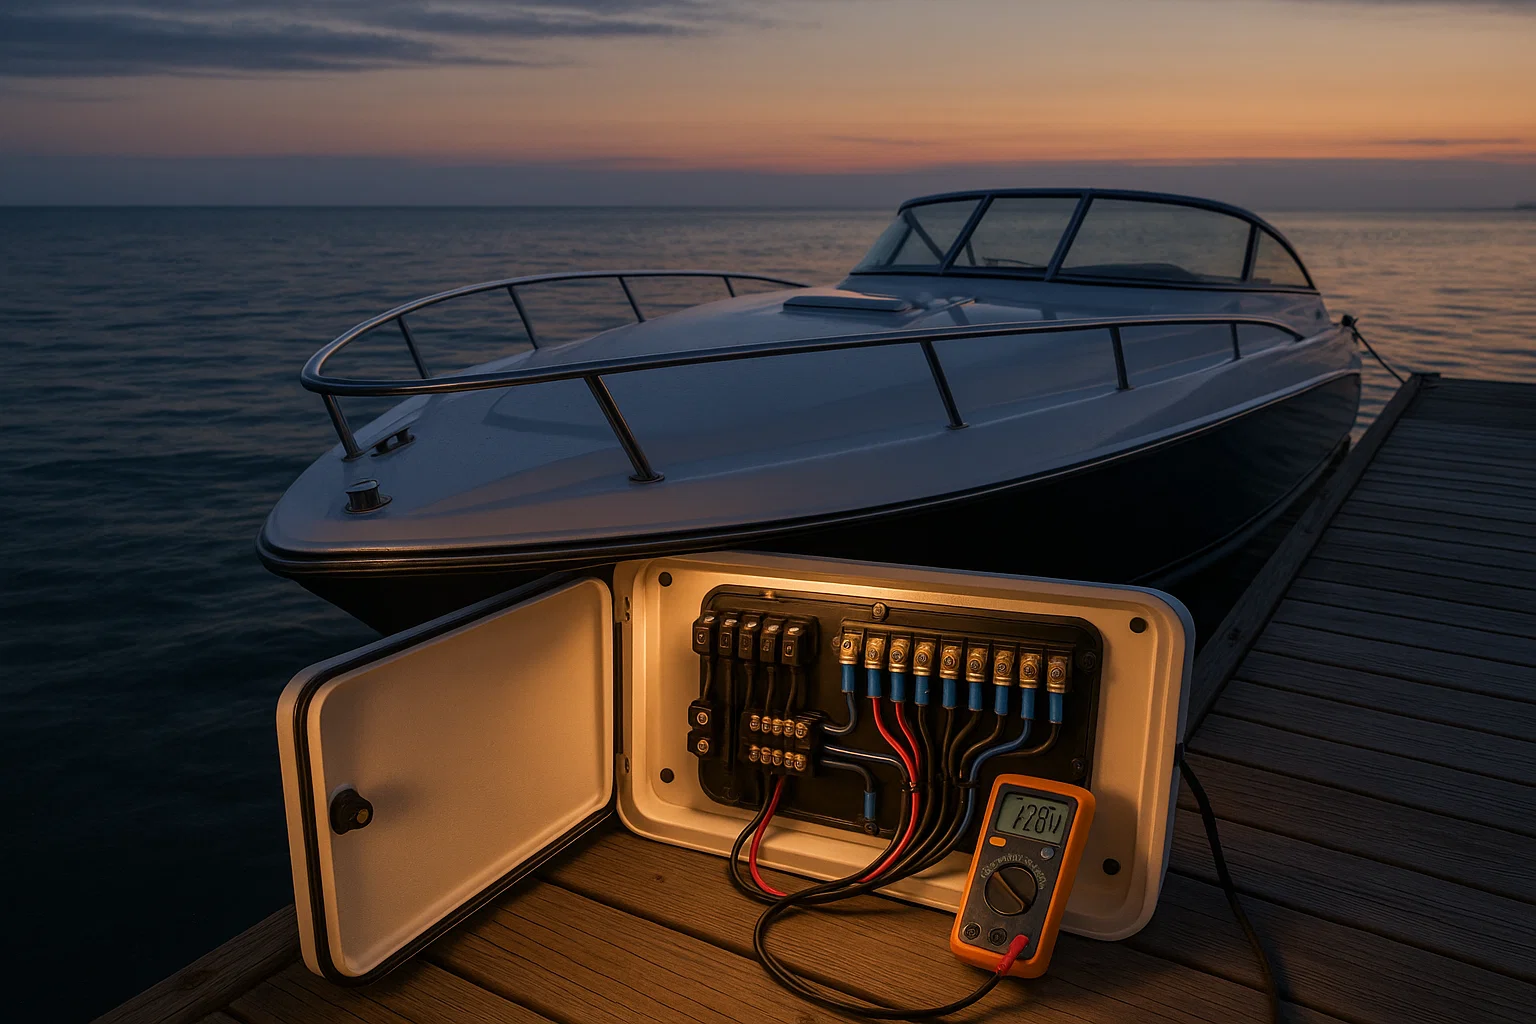
- Master the multimeter to see what’s happening in your circuits. Use it to perform voltage drop tests to find high resistance and continuity tests (with power off) to locate broken wires or failed connections.
- Fix poor connections permanently as they are the root cause of most intermittent power problems. The only reliable repair is to cut away corrosion, strip to bright, clean copper, and install a new, crimped, and sealed terminal.
- Start troubleshooting with the simple checks first before grabbing tools. Verify all switches are on, perform a quick visual inspection for loose wires, and check the battery’s resting voltage to avoid chasing complex problems with a simple cause.
- Establish a proactive maintenance schedule to prevent most failures. Regularly clean battery terminals, tighten all major connections, and visually inspect wiring for signs of chafe or heat damage.
These professional techniques are the key to moving from reactive repairs to proactive reliability. For a deeper dive into each step, read the full guide.
Introduction
You flip a switch on your boat—for the bilge pump, the navigation lights, the engine blower—and get nothing but a dead, frustrating silence. It’s a moment every boater dreads, turning a relaxing day on the water into a stressful troubleshooting session.
This isn’t just bad luck. A boat’s electrical system is in a constant battle against a perfect storm of salt, moisture, and vibration that actively works to destroy every wire and connection. Understanding how to fight back is the difference between anxiety and confidence.
This guide moves beyond random guesswork. We’re here to give you the methodical approach used by professional marine technicians, empowering you to find and fix problems with certainty.
You’ll gain the skills to:
- Diagnose issues with a systematic troubleshooting process.
- Perform durable, professional-grade repairs that last.
- Understand why marine-grade components are non-negotiable.
- Build a resilient system you can truly depend on.
Forget feeling intimidated by that tangle of wires behind the helm. By the end of this guide, you’ll have the knowledge to trace faults, make reliable fixes, and gain complete confidence in your boat’s electrical systems.
Our journey begins not with a multimeter, but with a deep dive into the harsh environment your system must survive every time you leave the dock.
Understanding the Marine Electrical Environment: Why Boats are Different
A boat’s electrical system lives in an environment that is actively trying to destroy it. Unlike a car or a house, a vessel combines constant moisture, corrosive salt, and relentless vibration into a perfect storm for electrical failures.
Understanding these unique challenges is the first step to mastering any repair.
The Constant Battle Against Corrosion
Saltwater, salt spray, and even high humidity create a hyper-corrosive atmosphere that attacks metal components relentlessly. This environment invites galvanic corrosion, a process where different metals in electrical fittings essentially eat each other away.
This corrosion has a devastating impact on the most vulnerable parts of your system:
- Terminals and connectors that become weak and resistive.
- Wire conductors that turn from bright copper to a green, flaky powder.
A corroded connection creates high resistance, which generates heat and eventually leads to a complete circuit failure. It’s why tinned marine-grade wire is non-negotiable on the water.
The Impact of Vibration and Physical Stress
Picture your boat’s engine running while pounding through chop. Every wire and connection is subjected to constant, high-frequency vibration and physical stress.
This movement is a primary cause of some of the most common electrical faults, including chafed insulation, frayed wires, and loosened terminals. A terminal that was tight at the dock can easily work itself loose after a few hours underway.
Properly supporting all wiring with clamps, ties, and chafe protection isn’t just neat—it’s essential for survival.
The Dangers of a Closed, Damp Environment
An electrical fault on a boat isn’t just an inconvenience; it’s a serious hazard in a closed, damp space. Moisture can create unintended electrical paths between wires or from a wire to a metal part of the hull, leading to short circuits.
In an engine room where fuel vapors can accumulate, a single spark from a faulty connection can be catastrophic. This is why using ignition-protected components and perfectly sealed, waterproof connections is a critical safety rule, not a suggestion.
Your electrical system must be built not just to work, but to fail safely. The harsh marine environment demands a higher standard of care, where every connection is deliberately protected against its three biggest enemies: corrosion, vibration, and moisture.
Anatomy of a Marine Electrical System: Key Components and Their Roles
Think of your boat’s electrical system like the human body’s circulatory system. The batteries are the heart, the wires are the veins and arteries, and the panel is the brain directing it all.
Understanding how these core parts work together demystifies the entire system, turning a tangled mess of wires into a logical map you can follow to find and fix nearly any problem.
The Power Source: Batteries and Charging
Everything starts with the battery bank. Unlike a car, a boat has diverse power needs, which is why we use specialized batteries.
- Starting Batteries: Deliver a powerful, short burst of energy to crank the engine.
- Deep-Cycle Batteries: Provide steady, lower-amperage power over long periods for running lights, electronics, and refrigerators. They are the marathon runners of your system.
- Dual-Purpose Batteries: A hybrid that can handle both starting and modest deep-cycle loads, often used on smaller boats.
While the engine is running, the alternator and voltage regulator work together to recharge the batteries, typically producing a voltage between 13.2V and 14.4V at the battery terminals.
The Distribution Network: Wiring and Panels
Power travels from the batteries through a network of wires and distribution points. Using the right materials here isn’t just best practice—it’s a critical safety requirement.
Marine-grade wire is fundamentally different from automotive wire. It features tinned copper strands for corrosion resistance and a higher strand count for flexibility, resisting failure from engine vibration. Using automotive wire on a boat isn’t saving money; it’s buying a future electrical failure.
The DC distribution panel, with its array of switches and circuit breakers, is the central hub. From there, power is often routed to bus bars and terminal blocks, which provide clean, organized connection points and prevent a chaotic “rat’s nest” behind your helm.
Circuit Protection: Fuses and Breakers
A fuse or breaker has one primary job: to protect the wire, not the device connected to it. This is one of the most important concepts in marine electrical safety.
When a circuit draws too much current, the fuse blows or the breaker trips, cutting power before the wire can overheat and start a fire.
The key difference is simple: fuses are a one-time use protection, while circuit breakers are resettable switches. Because of this, you must never replace a fuse with a larger one to stop it from blowing. That’s like removing the smoke detector because the alarm is annoying—you’re ignoring the symptom and inviting disaster.
Understanding these components is the first step to confidently diagnosing issues. When you know what each part is supposed to do, it becomes much easier to spot when one is failing.
Systematic Troubleshooting: A Methodical Approach to Finding the Fault
Randomly poking at wires is a recipe for frustration and potential danger. A methodical approach lets you trace problems logically, moving from the simplest possibilities to more complex faults with confidence.
Safety First: The Golden Rules of Marine Electrical Work
Before you touch a single wire, safety must be your priority. These rules are non-negotiable.
- Power Off Completely: Turn off all power at the source. This means shutting down the main battery switches and flipping the relevant circuit breakers to the off position.
- Use Lockout/Tagout Procedures: This professional technique prevents disaster. Place a tag on the main switch to ensure no one accidentally re-energizes a circuit while you are working on it.
- Wear Personal Protective Equipment (PPE): Always wear safety glasses and gloves.
The Initial Assessment: Low-Hanging Fruit
A surprising number of electrical gremlins are caused by simple oversights. Start here before grabbing any tools.
First, do a “switch check.” Verify the battery selector, main breaker, and the device’s own switch are all in the ‘ON’ position.
Next, perform a quick visual inspection for loose wires, disconnected plugs, or heavily corroded terminals. Often, the problem is right in front of you. Finally, check the battery’s state of charge with a voltmeter. A resting voltage below 12.0V indicates a charging problem that must be solved first.
Mastering the Multimeter
Think of your multimeter as the tool that lets you see electricity. It’s essential for moving beyond visual checks and finding the exact point of failure.
- Voltage Testing: Measure DC voltage at the battery, then at the distribution panel, and finally at the non-working device. A significant drop in voltage along the way points you directly to the problem area.
- Continuity Testing: With the power OFF, this function tests for a complete path. Use it to check fuses and identify “unwanted open” circuits—a very common failure—caused by a broken wire or a failed connection.
This systematic process, moving from safety to simple checks to precise measurements, is the most effective way to diagnose and solve electrical problems on board. It transforms guesswork into a clear, step-by-step investigation.
Common Marine Electrical Failures and Professional Repair Techniques
Most electrical gremlins on a boat trace back to a handful of common culprits. Instead of guessing, you can solve the vast majority of issues by methodically tackling the most frequent failures with professional-grade techniques.
This isn’t about guesswork; it’s about knowing where to look first.
Problem 1: Power Loss from Poor Connections
Flickering lights or a dead bilge pump are rarely caused by a broken device. The root cause of intermittent power is almost always a poor connection fighting a losing battle against the marine environment.
Visually inspect terminal ends, bus bars, and connectors. Don’t trust electrical tape—peel it back to look for hidden green corrosion on the copper.
A proper repair is the only permanent fix:
- Cut away the old, corroded terminal completely.
- Strip the wire back until you see clean, bright copper strands.
- Crimp on a new, high-quality, marine-grade terminal using a dedicated crimping tool, not pliers.
- Seal the entire connection with adhesive-lined heat-shrink tubing to lock out moisture for good.
Problem 2: Tripped Breakers and Blown Fuses
Remember this: a blown fuse is a symptom, not the problem itself. It’s your electrical system’s way of screaming for help before a wire overheats and starts a fire.
The two main causes are short circuits (a hot wire touching a ground) or simple overloads. Isolate the circuit and use a multimeter to find a short. If there’s no short, check if you’re running too many accessories on a single circuit.
The golden rule is absolute: Never replace a fuse with a larger one to stop it from blowing. You are only removing the protection and creating a serious fire hazard.
Problem 3: Battery Charging and Alternator Faults
When your batteries won’t hold a charge, your alternator system is the first place to investigate. A simple voltage test with the engine running tells you almost everything you need to know.
With your engine at a fast idle, measure the voltage directly at your battery terminals. A healthy charging system should read between 13.2V and 14.4V.
Here’s how to interpret the results:
- Voltage near 12V and not rising: Suspect a bad alternator, a loose belt, or a wiring issue between the alternator and batteries.
- Voltage above 14.8V: You likely have a faulty voltage regulator that is “cooking” your batteries and will destroy them quickly.
Before calling for help, perform a quick check of the alternator belt tension and inspect the main wire connections at both the alternator and the battery.
Fixing connections, understanding why fuses blow, and performing a quick voltage test will solve over 90% of your electrical headaches. A methodical approach always wins.
Proactive Maintenance and Building a Resilient System
The most effective electrical repair is the one you never have to make. Moving from a reactive mindset to a proactive one is the single best way to ensure reliability and safety on the water.
A resilient system isn’t built by chance; it’s the result of consistent maintenance and smart installation practices that anticipate the harsh marine environment.
Creating a Regular Inspection and Maintenance Schedule
Dedicate a small amount of time each quarter to a proactive system check. This simple routine can prevent the vast majority of electrical failures before they leave you stranded.
Your checklist should be simple and repeatable.
- Clean and Protect: Clean all battery terminals and coat them with a dedicated corrosion inhibitor spray.
- Check Connections: Gently check and tighten all major connections at the batteries, main switches, bus bars, and distribution panels.
- Visual Inspection: Scan accessible wire runs for any signs of chafe, discoloration from heat, or cracking insulation.
- Test Critical Systems: Always test your bilge pumps, navigation lights, and VHF radio to confirm they power on correctly.
Best Practices for Upgrades and New Installations
Every new wire or device you add is an opportunity to either strengthen or weaken your boat’s electrical backbone. Follow professional standards to ensure every addition improves your system.
Picture this: years from now, you’re troubleshooting an issue and every wire is clearly labeled. That’s the gift you give your future self by doing it right the first time.
- Use the Right Materials: Always use marine-grade (tinned) wire, which is specifically designed to resist corrosion. Ensure it’s correctly sized for the amperage and the length of the wire run.
- Document Everything: Label every new wire at both ends and update your vessel’s wiring diagram. This is invaluable for future work.
- Secure All Wiring: Support wire runs at least every 18 inches with clamps or cable ties to prevent damage from engine vibration and boat movement.
Knowing When to Call a Certified Marine Electrician
Knowing your limits is a critical safety skill. While many tasks are achievable for a careful DIYer, some problems demand professional expertise to avoid creating a fire or safety hazard.
If you see any of these red flags, it’s time to stop and call in a pro:
- Persistent system-wide failures that don’t have an obvious cause.
- Any evidence of melted wires, scorch marks, or excessive heat.
- Any work involving the AC shore power system.
For complex diagnostics or major installations, hiring an ABYC-certified (American Boat and Yacht Council) technician ensures the work is done to the highest safety and compliance standards.
Ultimately, proactive maintenance transforms your relationship with your boat’s electrical system. A few minutes of prevention each month eliminates hours of stressful troubleshooting at sea, giving you confidence every time you leave the dock.
Conclusion
Mastering your boat’s electrical system isn’t just about fixing what’s broken; it’s about building unbreakable confidence every time you leave the dock. You now have the framework to move from reactive repairs to proactive command of your vessel’s reliability.
The key isn’t memorizing every possible fault, but embracing a methodical mindset.
- Connections are your primary focus. The vast majority of electrical failures begin at a single terminal fighting a losing battle against corrosion or vibration.
- The right materials are non-negotiable. Tinned marine wire, quality crimped terminals, and adhesive heat-shrink are your system’s best defense.
- A multimeter is your most powerful tool. It allows you to move beyond guesswork and pinpoint the exact source of a problem with certainty.
- Prevention is the ultimate repair. A simple, regular inspection schedule will prevent most electrical surprises before they can ruin a day on the water.
Your journey to electrical mastery starts now with one simple action.
This weekend, perform your first proactive system check. Grab a wrench and a corrosion inhibitor spray, and give your battery terminals the attention they deserve. Or, inventory your toolkit—is a quality wire crimper on your shopping list?
Your boat’s electrical system doesn’t have to be a source of anxiety. By understanding its enemies and treating every connection with care, you transform it from a web of wires into a foundation of reliability.
Master these fundamentals, and you’re not just fixing circuits—you’re protecting your peace of mind on the water.
Leave a Reply