
Key Takeaways
Installing an inboard motor is a significant undertaking, but breaking it down into methodical steps makes it manageable and rewarding. Success hinges on precision, patience, and a non-negotiable focus on safety. These core principles will guide you through a professional-grade installation from start to finish.
- Establish the driveline axis first as it is the absolute foundation of your installation; even a minor error here creates destructive vibration and catastrophic wear.
- Prepare your workspace meticulously by gathering specialized tools like an engine alignment tool and ensuring your boat’s stringers are structurally sound before you begin.
- Achieve perfect alignment by using a feeler gauge to ensure the gap between the shaft and transmission couplings is less than 0.003 inches all the way around.
- Leave engine mounts loose initially after lowering the engine into place; do not fully torque the bolts until after you have perfected the driveline alignment.
- Prevent catastrophic water leaks by using two stainless steel clamps on all cooling hose fittings that are located below the boat’s waterline.
- Create a safe exhaust system by ensuring the entire run has a constant downward slope away from the engine to prevent water from flowing back into the cylinders.
- Perform a final alignment check after the boat is launched and has settled in the water for a few hours; this non-negotiable final adjustment is critical for long-term reliability.
Use these takeaways as your guide to confidently tackle each stage detailed in the full article.
Introduction
The difference between a powerful, smooth-running boat and one that vibrates itself apart often comes down to a measurement thinner than a credit card.
Tackling an inboard engine installation is one of the most rewarding projects a boat owner can undertake. It’s a job where precision and patience pay off far more than brute force.
Get it right, and you’re rewarded with years of reliable power. But a small mistake in alignment or mounting can lead to destructive vibration, premature wear, and costly repairs down the line.
This guide is your step-by-step roadmap, breaking down the entire process from an empty engine bay to a successful launch. We’ll walk you through the mission-critical steps that ensure a professional result.
You will learn:
- How to prepare your engine bay and toolkit for a flawless job.
- The secret to establishing a perfect driveline axis from the start.
- The correct procedure for safely lowering and securing the engine.
- A detailed process for achieving precision, sub-millimeter alignment.
- A final checklist for a leak-free, reliable first run on the water.
This isn’t about rushing to the finish line. It’s about building a foundation for success, and that foundation begins long before you ever touch the engine hoist.
Gearing Up: Your Essential Toolkit and Workspace Preparation
A successful engine installation is 90% preparation. Rushing this stage is the fastest way to create costly problems down the line, so let’s set the stage for a smooth, professional-grade job.
Getting this right from the start transforms a complex task into a manageable process.
The Professional’s Toolkit
Before you even think about lifting the engine, you need the right gear. Trying to improvise here will only lead to frustration and potential damage to your boat or the new motor.
Here’s what your professional toolkit must include:
- Heavy Lifting Equipment: An engine hoist or crane is non-negotiable. Ensure its weight rating comfortably exceeds your engine’s weight, and consider renting one for a weekend to save on costs.
- Essential Hand Tools: Gather complete wrench and socket sets (both metric and imperial), a calibrated torque wrench, and various screwdrivers. Always use new, marine-grade fasteners to fight back against corrosion.
- Specialized Alignment Tools: An engine alignment tool and a set of feeler gauges are your most important instruments. They are absolutely critical for preventing destructive vibration and premature wear on drive components.
- Materials & Consumables: Get a high-strength marine sealant (like 3M 5200) for all mounts and fittings. If your stringers need work, you’ll also need fiberglass resin, hardener, and cloth.
- Personal Protective Equipment (PPE): Don’t skip this. Safety goggles, heavy-duty gloves, and steel-toed boots are mandatory.
Preparing the Engine Bay for a Perfect Fit
With your tools ready, turn your attention to the engine bay. This isn’t just about cleaning; it’s a critical inspection to ensure the boat’s structure can handle the new power.
Start by thoroughly degreasing and cleaning the entire compartment. A clean surface reveals hidden issues like cracks, delamination, or soft spots in the hull and stringers.
The engine stringers are the structural foundation for your motor. Press on them firmly to check for any flex or softness. If they feel compromised, they must be repaired or reinforced with fiberglass before proceeding—a job that often requires a professional.
Finally, use your engine’s footprint to mark the locations for the motor mounts. Live by the “measure twice, drill once” mantra. After drilling your pilot holes, be sure to completely seal the raw wood or composite core of each hole with marine sealant to prevent water intrusion.
Thorough preparation is the foundation of the entire project. Having the right tools on hand and a perfectly prepped engine bay ensures that when it’s time to lower the engine, it drops into place without a single surprise.
The Critical First Step: Establishing the Driveline Axis
Before the engine even gets near your boat, you must establish the single most important line in the entire project. This isn’t just a step; it’s the central pillar that determines whether your boat runs smoothly or vibrates itself apart.
Getting this driveline axis perfect is the foundation for a successful installation.
Understanding Driveline Geometry
Think of the prop shaft axis as an imaginary centerline running perfectly straight from the engine’s transmission, through the hull, and out to the propeller.
Picture aiming a laser pointer across a long room. Even a tiny shake of your hand results in a huge movement on the far wall. The same principle applies here. A small error at the engine creates a major alignment problem at the prop.
A misaligned axis guarantees problems, including:
- Destructive vibration throughout the boat
- Excessive wear on the cutless bearing and shaft seal
- Potential for catastrophic damage to the transmission
Mapping the Shaft Line
Your first job is to use precise measurements to locate the exact center point where the shaft will exit the hull. Once found, you need to project this line through the engine bay.
You have two primary methods for this:
- The Cable Method: A thin, taut steel cable is stretched from a fixed point on a bulkhead to your mark on the keel, creating a physical reference line.
- The Laser Method: A modern and highly accurate approach using a laser alignment tool to project a perfect beam of light along the target axis.
With your line established, you can drill perfectly centered pilot holes through the main bulkhead and keel. These holes will guide the installation of the shaft tube.
Installing the Shaft Foundation
The shaft tube (or shaft log) is the housing that the propeller shaft runs through. It’s supported by the stern bearing (cutless bearing) and sealed inside the boat by the stuffing box or a dripless shaft seal.
You’ll carefully position the shaft tube so it lines up perfectly with your pilot holes.
The tube is then permanently “glassed-in” to the hull using layers of fiberglass cloth and resin. This process creates an incredibly strong, watertight seal that becomes an integral part of the boat’s structure.
Ultimately, the time spent here is non-negotiable. Perfecting the driveline axis ensures every component that follows is set up for a long and reliable service life.
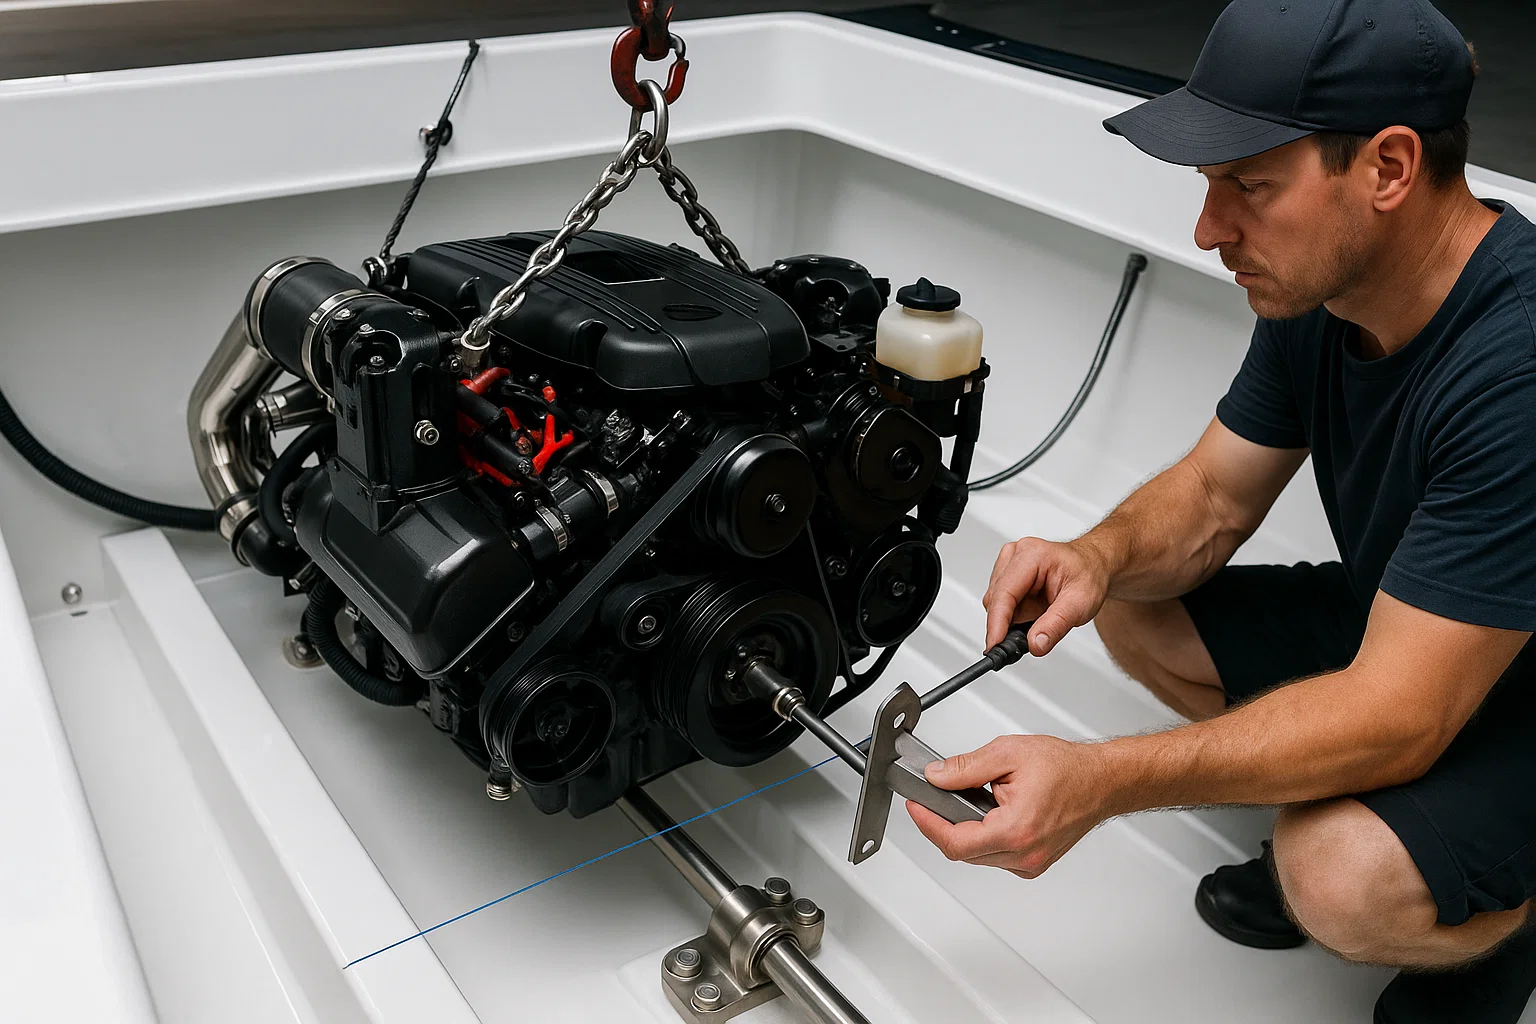
The Main Event: Lowering and Securing the Engine
This is the moment where the project takes shape. With a typical marine engine weighing over 500 pounds, success here is defined by control, safety, and a methodical approach, not speed.
A steady hand on the hoist is far more important than a fast installation.
Rigging and Lifting with Confidence
Before you lift, prepare the engine for its journey. To minimize bulk and prevent damage, attach essential components like motor mounts but leave off accessories like the alternator and exhaust manifold until later.
Properly rig the engine using high-quality chains or straps attached only to the manufacturer-designated lift points. Never improvise lifting points.
Picture this: the engine hovering over your pristine engine bay. This is where patience pays off.
- Hoist Operation: Ensure the engine hoist is on a stable, level surface before taking the load.
- The Descent: Lower the engine slowly and deliberately, with a spotter guiding it to prevent any contact with the stringers or hull sides.
Initial Placement and Mounting
Carefully guide the engine’s mounting feet until they sit perfectly over the pre-drilled holes in your stringers.
With the engine in place, you can install the mounting hardware.
- Hardware Choice: Use thru-bolts with nuts and backing plates for the strongest connection. Lag bolts should only be used if you absolutely cannot access the underside of the stringer.
- Load Distribution: Always use large, thick washers under bolt heads and nuts. This prevents the hardware from crushing the fiberglass stringers under load.
Now for the most critical step of this phase: snug the mounting bolts down, but do not fully torque them yet. The engine must have slight freedom of movement for the precision alignment phase that comes next.
Your goal here is temporary placement, not final permanence. Leaving the engine slightly loose is the secret to achieving the perfect driveline alignment that ensures a smooth, vibration-free future on the water.
Perfecting the Connection: Precision Engine Alignment
This is the technical heart of the installation, where precision directly translates into performance and longevity. Getting the engine alignment right is what separates a professional job from a problematic one.
Why Perfect Alignment is Non-Negotiable
Poor alignment is the root cause of most driveline issues, leading to premature wear on bearings, shaft seals, and transmission components. It introduces destructive vibration that can be felt throughout the boat.
Imagine a spinning jump rope with a big wobble in the middle—that wobble is wasted energy creating stress. Perfect alignment is non-negotiable for a smooth, efficient, and reliable system.
Remember that alignment must be checked now and again after the boat has been in the water. The hull can flex slightly under its own weight, which is enough to alter your precise settings.
The Alignment Process: A Step-by-Step Guide
First, slide the propeller shaft into place from outside the hull, passing it through the stern bearing and shaft tube. Attach the shaft coupling securely.
Now, bring the prop shaft coupling and the transmission output coupling together. They should meet perfectly flush with absolutely no resistance. If you need to force them together to insert the bolts, the engine is not yet aligned.
This is where you use a feeler gauge. Measure the gap between the two coupling faces at four points: top, bottom, port, and starboard. The goal is to have no gap at all, or a gap that is less than 0.003 inches all the way around.
Adjusting the Mounts for a Perfect Fit
Making adjustments is a patient, iterative process. Every change in one direction will likely affect the other, so work slowly and re-measure after every adjustment.
- Vertical Adjustment: Raise or lower the engine by turning the large nuts on the vertical adjustment studs of the motor mounts.
- Lateral Adjustment: Shift the engine from side-to-side. Since the mounting bolts are still just snug, you can use a lever to carefully nudge the engine into position.
Patience is the most important tool you have here. This methodical process of measure-adjust-remeasure is the only way to achieve a perfect, vibration-free connection that protects your investment for years to come.
Bringing It to Life: Connecting All Auxiliary Systems
With your engine mechanically secured, it’s time for the final hookups. This is where your boat gets its pulse—connecting the fuel, electrical, cooling, and exhaust systems methodically is key to a reliable first start.
The Fuel System: Clean and Leak-Free
A leak-free fuel system is a non-negotiable for safety. Start by routing your fuel lines without any sharp bends or kinks that could restrict flow.
- Connect the supply line from the fuel tank to the engine’s primary filter or fuel pump.
- Attach the fuel return line if your engine requires one.
- Always use Coast Guard-approved fuel lines and install an anti-siphon valve at the tank for ultimate safety.
Power and Control
Next, bring the electrical system online. Proper wiring prevents frustrating issues down the road and ensures your safety systems work when you need them.
Remember the golden rule of battery connections: connect the positive cable first, and when disconnecting, remove the negative cable first.
- Connect the main battery cables: positive to the starter and negative to a solid engine block ground.
- Route the main engine wiring harness to the helm, connecting the ignition, gauges, and alarms.
- Wire in crucial safety gear like the main battery switch and the bilge blower, which is essential for gasoline engines.
Cooling: Keeping Temperatures in Check
An engine’s cooling system is its lifeline. Whether your engine is raw-water cooled (using outside water) or freshwater cooled (with an internal coolant loop), the connections must be perfect.
Connect the raw water intake hose from its seacock to the engine’s water pump. For freshwater systems, route the hoses to and from the heat exchanger.
The most important rule? Use two stainless steel clamps on all hose fittings below the waterline. This simple step can prevent a catastrophic leak.
The Exhaust System: Venting Safely
Properly routing the exhaust prevents water from flowing back into your engine—a catastrophic failure known as reversion.
Connect the engine’s exhaust riser to the boat’s muffler and tubing. Ensure the entire run has a constant downward slope away from the engine. Use high-quality, marine-grade wet exhaust hose secured with t-bolt clamps for a durable, leak-proof seal.
Connecting these auxiliary systems transforms a mounted engine into a functional powerplant. By methodically working through each system and double-checking every clamp and connection with marine-grade parts, you’re building in the reliability and safety you’ll depend on out on the water.
Final Checks and Pre-Launch Commissioning
This is your final quality control phase before the boat hits the water. A methodical approach here prevents frustrating issues at the boat ramp and protects your investment.
Think of these last steps as the final gate between a finished project and a reliable, sea-worthy vessel.
The Pre-Launch Checklist
With the engine mechanically secure, it’s time to double-check every detail. Go back and torque all motor mount bolts to the precise manufacturer specifications using a torque wrench.
Next, run through a comprehensive physical inspection. This is your last chance to catch a loose connection on dry land.
- Fittings & Clamps: Systematically check the tightness of every single connection—fuel lines, all cooling hoses, and the entire exhaust system.
- Fluid Levels: Fill the engine with the correct grade of oil and the transmission with the specified fluid. If you have a freshwater-cooled system, fill it with the appropriate coolant mixture.
- Shaft Rotation Test: Rotate the prop shaft by hand. It should spin smoothly with minimal resistance. Any grinding, catching, or binding is a red flag that your alignment needs to be revisited immediately.
The First Run: Testing Safely on Land
Before launch, you need to perform a brief, controlled test run. This requires supplying cooling water directly to the raw water pump intake with a hose.
WARNING: Only run the engine for 30-60 seconds. The goal is a quick systems check, not to let it reach full operating temperature.
During this brief test, look and listen for:
- Immediate oil pressure on the gauge.
- Water successfully pumping through and exiting the exhaust.
- Any signs of fuel, oil, or water leaks.
- Unusual vibrations or metallic sounds.
Final In-Water Checks
After launching, your first action is to open the engine hatch and perform a thorough leak check. Pay close attention to the stuffing box or dripless shaft seal and all thru-hull fittings.
The most critical step of the entire commissioning process comes next. After the boat has been in the water for a few hours, the hull will settle into its natural shape. At this point, the engine alignment must be re-checked with a feeler gauge.
This final in-water alignment adjustment is non-negotiable. It’s what ensures a vibration-free ride and the long-term health of your entire driveline.

Conclusion
You’ve just navigated one of the most demanding and rewarding projects a boat owner can undertake. Installing an inboard motor is more than a mechanical task; it’s about taking ownership of your boat’s heart, ensuring every component works in perfect harmony.
The meticulous work you’ve put into preparation, measurement, and assembly is the foundation for countless safe and reliable hours on the water.
Your success ultimately hinges on a few core principles. Keep these top of mind:
- Preparation is 90% of the job. A clean, inspected engine bay and the right professional tools are your best defense against costly mistakes.
- Perfect alignment is non-negotiable. Your feeler gauge is the most important tool in this project. The driveline axis is the absolute foundation of a smooth, vibration-free system.
- The job isn’t done at the dock. Re-checking your alignment after the boat has settled in the water is the final, critical step that separates amateur work from a professional installation.
Your next step is the shakedown cruise. Plan a short, initial trip in calm conditions. Listen carefully to the engine, feel for any unusual vibrations, and keep a close watch on your gauges. This isn’t just a test run; it’s your final quality check.
You didn’t just install an engine; you took complete control of your vessel’s performance and reliability. Now, cast off the lines, push the throttle forward, and enjoy the confidence that comes from knowing you built it right, from the stringers up.
Leave a Reply